Kills: 23 Items: 9, Plus Guardhouse Key, Rusty Key, Grenade Launcher Secrets: 3
You Start With: small med-pack, large med-pack, 2 flares, pistols, shotgun with 2 shells.
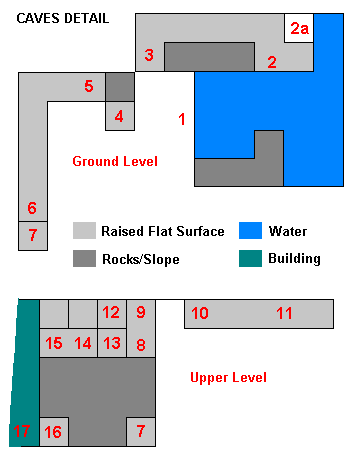
Cross the cavern and wade into the water (1). Climb onto the rocks at left (2 or 2a). Turn and shoot at the tiger that emerges below. Follow the ledge to the end (3) then do a standing jump to the block ahead (4). Turn around and jump to the next ledge (5). Follow this ledge to its end (6) and climb onto the rock in front of you (7). Reverse and do a running jump to the ledge across from you (8). This ledge is short. To the right,across a small gap, is a longer ledge that spans the wall you were facing when you first entered the cave. Jump across to this ledge (from 9 to 10) and follow it to the end (11), where you�ll find SECRET #1, the Stone Dragon. From up here you can kill a second tiger in the cave. Return across the small gap (back to 9) then climb up three blocks, two waist high (12 and 13), one taller (14). Look to the left to see the flat area you�ll need to jump to next. Stand near the wall (15) and take a running jump to the flat area (16), then pull up into the building (17). Stand on the trap door to drop down into the room below. Swim out of the pool and go to the top of the stairs. Do a running jump and grab the ledge near the switch, pull up. Pull the switch to open the door. Go out onto the wall and kill 3 crows that�ll approach from the other building. Continue toward the second building, and then take the slide to the right down into the water. You�ll find the GUARDHOUSE KEY In a small underwater cave. Climb out of the water and kill the tiger. Face the wall and climb up on the rocks to the right of the pool. Use the key to unlock the guardhouse door. Enter and kill 3 spiders. Climb the ladder, kill another spider and take the RUSTY KEY, which unlocks the exit door below. Go through the exit and continue to the next room. 3 spiders will come down from the ceiling and another spider will come in behind you, so kill all of them. Take the shotgun shells and large Medi-pack from the skeleton. Move the block away from the exit and go through this opening. Slide down the ramp to the right and step into the water. This area is a trap in which sharp blades are shot across the room from various holes. To clear it, go to the left wall and jump and grab the crevice above. Hang and traverse all the way to the right, and the sharp blades will pass harmlessly below. Drop into the water, reverse underwater and swim to the corner near the door. Surface and pull up to the right side of the shooting blades. The next few areas make up a gauntlet of traps, which you�ll have to do in sequence in order to get through. First comes a series of broken floor tiles with deadly spikes below. Run over these, and then keep running, cutting to the right as you enter the next room. Rolling boulder�s pursue you, so keep running to the door on the left. Leap over the spikes to land on a slide, which will deposit you in a room with spiked walls encroaching. Jump left to land right on the automatic pistol clips, pick them up then jump forward to the opening and pull up. Here you can catch your breath. Now, run down the next hallway, over the collapsing floor with spikes below, leaping over the three slicing blades as you run. At the end of the hall, cut to the left. If you can manage to do it before the spiked walls close in, pick up SECRET#2, the Jade Dragon. Continue running down the next long hallway, keeping to the right to avoid the spiked walls moving in from the left. Slide down into the next room. Roll when you land to face the opposite direction from the spiked wall coming at you. Then run onto the collapsing floor to fall to safety below. Ahead you�ll see two huge rolling blades. In front of them is a skeleton with a small med-pack, which you can pick up. Now run through the blades and emerge in a cave above a huge cavern. There are 2 spiders in the area near the doorway to your right, and 3 more spiders will descend if you approach the rope slide. Don�t take the rope slide yet. Instead, stand at the edge of the huge cavern near the rope slide and look down. You�ll see a flat, square ledge with some moss growing on it to your right. Stand with your back to the cavern and hang and drop down to this ledge. Pull up to grab the crevice in front of you and traverse to the right till you can pull up into a small cave. Follow the path, picking up a box of flares on the way, until you reach a shaft with a ladder. Climb onto the small ladder; climb to the right then down the long, dark shaft to the cavern floor below. When you can�t climb down any further, drop to the floor. Enter the cavern and advance to the two skeletons. You�ll start to hear a rumbling, so prepare to fight the T-Rex. When Mr. Rex is dead, cross the cavern to an opening in the middle of the other short side. Here you can retrieve SECRET #3, the Gold Dragon. (If you�ve got all three secrets, you�ll also receive a bonus of a small med-pack, 3 pairs of grenades and the GRENADE LAUNCHER. By now you�ll be hearing more stomping and roaring. That�s Mrs. Rex come to mourn her poor departed husband out in the cavern. Put her out of her misery, then return to the tunnel by which you entered. Jump and grab the ladder and climb back up. Go all the way to the top of the ladder and you�ll come out near the rope slide. Now, grab the rope slide and hold on as you slide down to the opposite side of the cavern. Try to let go before the end of the ride to drop onto the green area. Two tigers charge from the doorway opposite. Kill both, then head through the doorway. You�ll emerge near a big wooden door, which should look familiar if you watched the opening movie. Approach the door to finish the level and watch a cut scene, in which Lara has words with a member of the Fiama Nera cult. Now you�re off to scenic Venice....
Kills: 24 Items: 23, plus Automatic Pistols, Boathouse Key, Steel Key, Iron Key Secrets: 3
Advance forward, taking care of a dog that charges from the courtyard ahead. A sniper will fire at you from a balcony on the right, so take care of him too. Proceed down the alley on the left of where you came in. Another dog and a thug will try and stop you, so kill them too, then take the small med-pack. Across the dock is a large wooden door. Swim underneath and push a button on the far wall. Swim back out and climb onto the dock next to the small wooden building. Enter this building and take the flares. Push the button to open the trap door and climb the ladder up to the second floor. Push another button here to open a second trap door, and climb onto the roof. Shoot out the window and go in. A dog is on guard in the room to the left. Kill it, then leave this room and exit through the window opposite the one you came in. Jump to the red awning, then to the balcony and take the BOATHOUSE KEY from the sniper you shot earlier. Return to the room where you shot the dog, go over the glassed-in walkway and throw a switch, which opens a door. Return to the room, shoot out the window and jump from the windowsill to the red awning across the canal. Go left across three red awnings to the door you just opened with the switch. Go in and throw a switch to open the large door below. Jump down into the water, swim under the large wooden door and use the key to unlock the door. This cues a thug to appear on the dock by the wooden building. Swim out of the boathouse and kill him, then take his AUTOMATIC PISTOLS. Then go back, get the boat and drive it through the door, which you just opened with the switch above.On the right, near the entrance is a small passage-containing SECRET #1, the Stone Dragon, plus some flares. Get back in the boat and continue straight. Turn right and take the boat over a waterfall. Jump into the water below the falls to find SECRET #2, the Gold Dragon. After retrieving it, take the only exit from this room into a room with many pillars. In the water just to the left of where you enter are 2 sets of Uzi clips. On the right is a ledge with two rats. On the far left is another ledge with a door, a window and a ladder going up. Manoeuvre the boat into the alcove to the right of the ladder. This is actually a boat lock, which will raise you up to the next area. Swim to the dock with the rat on it and kill it. Draw your guns and approach the window. Lara will aim at the thug behind the window, so shoot it out and dispatch the thug. Then take his auto pistol clips and the shotgun shells in the dark corner. In the other corner of the room use the switch to close the lock doors and raise the water level. Exit the room, climb the ladder, jump in the water and pull the lever to open the exit doors. I�ve included a map for the next part.
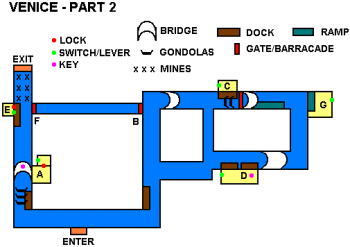
The orange block (marked ENTER) is the boat lock where you come into this area. Go left at the entrance, turn the corner and ram through the three gondolas to clear a path. Before proceeding, get out at the dock at which the gondolas were parked. Climb onto the platform and jump across the canal, grabbing the red awning and pulling up onto it. Jump over to the stone bridge on your right. A dog and a thug rush you from the left, another baddie from the right, so take care of all three. Onr of them has a large med-pack, and the other has a STEEL KEY. Go into the roof garden (A) and use the steel key to unlock the door. Enter, drop through the floor and flip a switch to open the first of two metal gates (B). When you return to the roof garden, a goon is waiting. Kill him and take 2 sets of auto pistol clips. Another bad guy is patrolling the stone dock down the canal on the left. You may be able to snipe him from the bridge. When he�s dead, go and lift 2 sets of M-16 clips off him. There�s a locked door here (E), so next you�ll need to find a key. Return to the area where you came in. Ditch the boat and head right from the entrance, swim around the corner, climb on the dock and take out the thug here. Take a large med-pack and 2 boxes of shotgun shells off the body. Return to the boat. Continue past the dock where you just were, take the second right under a white stone bridge. Ahead is a dock with 2 gondolas nearby. Ram the gondolas, since you�ll need a clear path here later on. When you step out on the dock, a bad guy comes through the door. Kill him and take the small med-pack he�s carrying. Enter the building, killing 2 rats, and then flip the switch that opens a door elsewhere (D). Head through the narrow waterway across from the dock. Make a left and get out on the covered dock with the door that you just opened. When you step out here, a thug appears on the other dock just to the right. Enter the building (D) to find a room with shallow water and ladders on the walls. On the floor is an IRON KEY. The door you came in closes behind you, so climb up through the hole in the floor. You�re met on the floor above by a thug and a dog. Kill them and take the small med-pack off the thug. Pull the lever that opens the exit door. You can shoot the thug below through the gap in the doorway. Or jump down and take care of him the hard way. The iron key opens the door at the stone dock (E). Head back there. Unlock the door and take out a goon who emerges, then relieve him of a small med-pack. Go inside and flip a switch that opens the second metal gate (F). There are underwater mines (x x x) in front of the exit, which is under the clock beyond the stone dock. At this point take one of your boats and set them off. Drive toward the mines and jump out at the last minute. You�ll destroy the boat, but you can take the other one from the stone dock. Now proceed to the room with the switch for the exit door (G). From the stone dock, go through the narrow waterway with the iron gates you opened, continue straight under the white stone bridge, turn right down the narrow waterway, then left past the two docks and under a bridge. Now turn left and you�ll end up near two doorways-one small, one large. Inside this room is the exit switch, guarded by a bad guy. Kill him. Across the way is a long wooden ramp leading up to a glassed-in walkway. Go up, shoot out the windows, enter the walkway and take SECRET #3, the Jade Dragon (plus 4 sets of auto pistol clips if you�ve got all of the secrets). Return to the room with the switch (G). Search the corpse there for some auto pistol clips. When you push the button, the exit doors open. As soon as you go over the ramp, a timer starts and you�ll need to get through the exit doors before they close. Get in your boat, position it facing the left side of the ramp. Now press forward+Action, go over the ramp and up the wooden ramp. Still holding Action, go through the walkway and land in the canal. Go under the white bridge, left then right, go under the metal gate, through the narrow waterway and under the other metal gate. Make a hard right then through the exit.
Kills: 37 Items: 22, plus Uzi�s, Library Key, Detonator Key Secrets: 3
You start this level in your boat on the other side of the doors you just squeaked through. Proceed straight ahead and the gate raises automatically. Dock your boat near the big doors on the right and get out, killing 2 rats. Take the stairs up to the left. A thug and 2 more rats greet you. When you�ve killed all three, take the thug�s large med-pack. Enter the building and continue up, killing 2 more rats on the way. Flip a switch here, which opens the big doors. Another bad guy comes out, so go around to meet him. When he�s dead, be sure and take his small med-pack before going in. As you enter, two gun-toting thugs greet you one is on the balcony above, the other behind the pillars. Take the shotgun shells from the one at ground level. You�ll have a chance to search the other in a few minutes. For now, go to the windows on the left side of the room. Shoot them out and kill the 2 dogs that rush you from inside. On the floor in this room is a small med-pack, flares and auto pistol clips. Return to the main room and turn left. Several robot guards with hacking swords block your way. Make your way carefully past them to the end of the passageway. Flip the switch here that opens some doors outside. Now, return to the main room. Find the largest of the wooden ramps and stand with Lara�s back to the ramp and her feet one tile�s width in front of it, then back flip onto the ramp, jump and grab the ledge in front of you. Find the moveable block with the flowers on it and push it up against the railing (2 pushes). Stand next to the block and do a running jump to the balcony with the sniper you killed earlier and retrieve the auto pistol clips. Use the climbable wall to cross to the decrepit looking windowsill. Ready weapons and go out onto the balcony. A sniper is firing at you from the balcony to the right. Kill him. Turn and go to the end of the balcony with no railing. Run, jump and grab the red awning. Hang and traverse left. Pull up and back flip onto the balcony behind you. Run, jump and grab the small wooden platform, pull up, then jump to the small red awning. Turn and jump into the doorway below. 2 dogs rush down the stairs, so ready weapons and take care of them. Continue up the stairs. A bad guy comes out of the room at the top of the stairs on the right. When he�s dead, go into this room and find the well-hidden switch on the wall next to the entrance. Pull it to open the door at the top of the stairs. This leads to the outside balcony from which the sniper was shooting at you earlier. Take his shotgun shells and SECRET #1, the Stone Dragon. Return to the room with the switch and the yellow wallpaper. A guard is patrolling the balcony outside the window. Shoot out the window and take care of him. Take 2 sets of Uzi clips off him, and then follow the balcony to another window. Shoot the window, then enter. Two thugs and a dog emerge when you hit the floor. Kill them. Inside the fireplace is a moveable block. Push it twice then climb into the passageway above, killing the rat. Follow the passage to a slope with blades at the top and bottom and a fire trap and pool of water below. Jump the two blades to land safely at the bottom. The flames are on a timer. When you step on the wooden area they go out but relight after a little bit. You can clear them using a series of standing jumps. Once you�ve cleared the firetrap continue to a door, which opens automatically. In the ballroom below is a guy and 2 more dogs. You can kill them from the doorway. Enter the ballroom and climb up on the first angled block. From the higher edge jump straight up and grab the chandelier above. Pull up. Run, jump and grab the middle chandelier and pull up. Again to the third chandelier. Walk to the edge, jump and pull up onto the platform above. Kill 2 rats before heading to the right around the pillar to the brick-floored area. From here, drop down and throw a switch, which opens a secret alcove on the opposite side of the room. Do a running jump back to the middle chandelier and climb back up to the platform where you killed the rats. Retrace your steps to the brick area. Walk to the edge and pull up onto the big rafter. Run and jump to the wood area on the other side. A thug jumps out from behind the low brick wall, so be ready for him. Take the small med-pack he�s carrying. Climb onto the wall, then jump over to the other rafter. Pull the switch here to change the height of the chandeliers. Return over the bricks to the wooden floor, and then drop down to the first chandelier, which is now the highest. From here, do a running jump to the windowsill on the right. Flip the switch here to open a trap door behind the fireplace. Return to the chandelier with a run, jump, and grab and pull up. Do a standing jump to the middle chandelier and another to the third chandelier. Turn and do a running jump to the alcove you opened earlier, grabbing the edge and pulling up. Take the LIBRARY KEY and drop to the floor. Run to the back of the fireplace, dropping into the water below to put out the flames. The books on the landing here show you�ve found the library, but before entering, you�ll need to do a little exploring. Pull the underwater lever to open a door into the next room. Go into this area and surface facing the chain link fence. Take a deep breath, then head down and to the left. Go right and continue underwater, navigating around columns and through narrow passageways. Pick up 2 pairs of grenades and SECRET #2, the Gold Dragon. On the wall near the Gold Dragon is a lever that opens a trap door above. Pull it and surface for air. Return the same way that you came to the library entrance. Unlock the library door then enter with guns drawn. A thug comes out of the room opposite, so take him out, then take the small med-pack he�s carrying. Go into the room he came out of, climb the bookshelves on the left. Kill 2 rats lurking on top of the other shelf. Jump across, climb onto the shelf and flip the switch, which opens one of the doors in the main room. A bad guy comes out, so go down to meet him. When he�s dead, head into the room where he came out. Climb up the shelves to the right of the door, turn left and climb up the shelves in front of you. Jump diagonally to the window, shoot out the pane and walk out onto the sill. Turn and slide backward down the awning, grabbing the edge. Pull up and back flip onto the balcony behind you. Do a running jump to the tiled roof below the awning, and then jump over onto the brick wall. You can see the boathouse across the canal. Walk along the brick wall to the other end, where there�s a slight ramp. Stand at the highest point and run, jump and grab the boathouse roof. Pull up and go to the back of the roof. On the left side you�ll see another brick wall with an opening behind it. Jump diagonally to the top of this wall. Drop down behind the wall into knee-deep water. On the floor are the UZIS. Climb out of this room and drop to the walkway below. Go around to the door, take out the guard and take his auto pistol clips and the DETONATOR KEY from the table inside. Cross the canal to the garden door, which opens automatically. A thug awaits you, so take him out and grab his large med-pack. Return to the main room and pull the switch here, which opens the remaining door. There are 2 thugs in the garden outside. When you enter the room, you can see them through the window. Kill them and take their shotgun shells and Uzi clips. In the garden where these two came from is a door that opens automatically when you approach. Go out to the canal and swim over to the far-left corner, where you�ll find a spot you can climb out. Kill the rat, then climb up onto the brick ledge. Pass by the detonator for now and climb onto the garden wall. Follow it to the end, climb up to the roof, shoot out one of the windows and enter the room beyond to take SECRET #3, the Jade Dragon (and 4 boxes of shotgun shells if you�ve found all three secrets). Return to the detonator and use the key to set off an explosion in the building where you just found the dragon. A sniper begins firing on you from the balcony above, so take care of him before proceeding. Go to the ruined building and climb to the top. From the top of the ruins drop down into the brick passageway. Slide down into the next level.
Kills: 47 Items: 29, plus Ornate Key #1, Ornate Key #2, Relay Box, Circuit Board Secrets: 3
You begin the level on a platform behind a huge wooden crate swinging back and forth on a rope. There�s an armed goon on patrol on the dock below. You can try and take him out from here or wait until you get to the other side of the canal. Dive into the water below. If you�ve already killed the gunman, grab the auto pistol clips he�s carrying, then swim to the far left corner. If you haven�t killed the shooter yet, swim FAST and remember to come back later for those clips. Climb up the ladder to the first landing. Now turn and pull up onto the ledge above. Throw the switch here, which opens a trap door not far away. Turn around and jump to the ladder, climb to the top then press and hold CTRL+FORWARD+ALT, until you land on the white ledge on the opposite side of the water. Do another running jump and grab the edge of the platform where you started the level. Shimmy to the right to avoid the swinging box and pull up. Take a running jump across the canal into the open trapdoor, avoiding that crate. Two nasty fellows are posted in here, so take care of them. Then take the small med-pack from one of them, along with the ORNATE KEY they were guarding. The exit door at the top of the stairs opened automatically when the second nasty fellow entered, so go out that way. Return again to the ledge where you entered the level. This time, take a running jump to the small flat area on the tiled roof to the right (your right if you�re facing the trapdoor you just jumped into). From there, jump forward onto the slanted roof, slide and grab the edge, then drop to the flat square below. Turn around and drop off backwards grabbing the edge. Traverse left until you�re in front of the window. Now release the Action button and quickly press it again to drop and grab the windowsill. Pull up and shoot out the window and enter the room, walking over the glass shards. Head to the left and climb the ladder. Unlock the door at the end of the hallway with the key. Follow the passage beyond and climb the next ladder to the roof. The next area is similar to the collapsing tiles you�ve encountered before. It�s a long way down but crossing really isn�t as hard as it looks. Just remember to keep moving. Line Lara up with the area that has a gap, three wood squares, another gap, two more wood squares and another gap. Walk to the edge, then do a standing jump to the first wood area. Immediately start running. Do a running jump off this wood area onto the next, then a running jump to grab the edge on the far side and pull up. Turn right and go to the wood square, pull up, and continue until you reach an opening on the right. There�s a thug below, and another baddie and 2 dogs rush you as soon as you hit the floor. Two more guys come out when you start exploring, so get rid of them too. Now go and pick up the booty: shotgun shells, auto pistol clips, 1 small med-pack and 1 large med-pack. Head for the opening in the far left corner with the swinging crate. To make the jump without getting clobbered, you�ll need to set it up pretty precisely. You want to be facing the box so it�s swinging toward and away from you, but you don�t want to be right in front of it. Instead, stand on the edge of the dome, on the closest flat square that�s just to the left of the box. Walk right up to the edge and sidestep as far left as you can. Take one hop back, then run, jump, grab the ledge and pull up next to the box. Jump down into the dark area below, where you�ll find a button. Push it to open the trap door out on the roof. Two thugs come charging out when it opens, so climb up and shoot them from above. One has shotgun shells and flares. You can now drop down into the lighting booth of the opera house. Here you�ll find two switches. The one on the right doesn�t work because it�s missing a circuit, which you�ll need to find. The left one opens the gate so you can get in. Before we go further, note that the opera house has 4 levels, not including the basement, lighting booth and roof. To keep things concise, I am calling the ground floor where the stage is Level 1, and so on up to level 4, where you�ll start exploring. Descend and go across the dark area to the right. There�s a boulder trap that is sprung when you walk down the slope. Set it off now, since you�ll need to come back here later and by then you may have forgotten about it. Once you hear the boulders rolling, get over to the right and you�ll be safe. Now push the button here to close the gate you just opened so you can get into the main auditorium. Jump up and grab the ladder, then climb up and into the doorway. Before you jump down into the room, notice the huge sandbag dangling from the ceiling in front of you. You�ll encounter a number of these. When Lara walks under them, they fall down and squash her, so take care. With that in mind, hop down and take care of the thug who comes in from the left. Take his small med-pack then head in the direction he came from. The double doors don�t open yet, so follow the hallway. Kill the 2 dogs that attack. Take note of the elevator shaft on the right. There�s a switch, but the panel nearby is missing a relay box, which you�ll have to locate. Return to where you came in, now head to the right. The double doors open and a thug and 2 dogs rush out. Kill them. From the area where they came in, turn and look across the open auditorium. You�ll see a guard patrolling on level 3. You can shoot him from here. Hang and drop through the opening to the level below. If you drop down on the edge of the opening closest to the open room, you�ll hear a click as a door opens below and a thug and 2 more dogs enter. Shoot them from above. Now drop down to ground level. Take the goon�s large med-pack. Notice the decaying brick area in the back wall. This is a boulder trap which is set off when you pass in front of it. Again, you may want to trip them now to avoid accidents later. Don�t bother going in the door where the guy and dogs came out; it�s another nasty boulder trap. Use the low steps at the back of the room to get up to level 2. Jump across the gaps to the side closest to the stage. To get from here up to level 3, you can go to the edge where there�s an opening above and a bit of floor above and ahead of you. Do a standing jump and grab this edge. Pull up, turn around and jump over to the area where the guard�s body is. Take the 2 sets of auto pistol clips he�s got. Go to the opening to the right of where you just pulled up. Jump down into the water and climb out on the first step, killing a rat. Turn around and do a standing jump and grab the ledge across the water and above. Kill another rat here. Turn around again and look up. There�s a guard on the floor above, along with a dog and 2 rats. Get up there and kill them. Follow the hallway to the windows. Shoot them out then hang and drop into the dressing room below. Throw the switch to open one of the doors. Slide forward down the ventilation duct, jumping at the last minute to grab the ledge above and avoid being chopped to bits by the huge fan. Take the ORNATE KEY. Climb to the uppermost brick ledge. Stand facing the fan below. Side jump onto the sloped surface, jump forward, grab the ledge in front of you and pull up. Kill the rat before proceeding along the duct. When you come to an intersection, jump forward taking care not to jump into the fan. Now turn around, walk to the edge and back flip onto the ledge above and behind. Again, walk to the edge and back flip up and you�ll clear the second fan. Before continuing down the passage, do a standing jump and grab the edge of the dark alcove above. Pull up and retrieve SECRET #1, the Jade Dragon. Return to the ledge from which you jumped and continue to a small room with a moveable crate. Pull it once. Flip the switch behind it to open a door back into the dressing room. Now pull the box once away from the wall, and push it through the opening into the dressing room until it�s up against the low step. Climb up to the window ledge where you�ll find another crate. Shoot out the windows. Push the second crate through the broken window on top of the other crate. Now you can climb up the stacked crates to the room above. Kill the guard who�s waiting for you up there. Return to the main auditorium, swim across the flooded orchestra pit and use the underwater block to climb up onto the stage. A dog runs out from the door on the left to meet you. Take care of him and the bad guy who starts shooting at you from the audience area. Also be careful of the two falling sandbags. The shooter isn�t carrying any goodies, but cross the water anyway. This will draw out another thug, who�ll emerge from the door on the left of the stage. Kill him and cross back to the stage to take his Uzi clips. Enter the door on the left of the stage and flip the switch to open a gate above the right door. Now, head for the door at the other end of the stage. Two goons come out when you approach. One has a large med-pack. Enter the room they came from. Along the two side walls are dangling sandbags that need to be brought down before you can proceed safely. Now return to the doorway and pull up onto the ledge where you just opened the gate. Head for the left side of the platform, avoiding the glass shards. Turn and face the lowest point of the crevice in the brick wall. Do a running jump to grab this crack, then traverse to the left until you can pull up. Flip the switch here to lower the drawbridge. Drop to the floor, return to the doorway and pull up to the platform with the broken glass again. This time cross the bridge you just lowered. Do a running jump and grab the wooden platform in the far left corner of the room. Pull up, then climb into the alcove above. From here you can shoot the rat on the high platform across the room. When it�s dead, do a running jump and grab the edge of this platform. Pull up. Now you�ll need to time a jump past the swinging sandbag. Avoid the second sandbag altogether by jumping to the flat area on the right of it. Enter the passage beyond and flip the switch. This drops a sandbag on the stage which busts open the trapdoor. Slide down the ramp, jumping just before you reach the end to sail through the trapdoor and land in the water below. Once you�re in the water face the ramp you just jumped from. Enter the opening on your left, proceed until you can turn left again. On one side of this flooded room is a switch. Flip it to open the exit door above on level 3. On the opposite side of the room, just under the water, is a small opening. Swim through it and follow the narrow tunnel to SECRET #2, the Stone Dragon. Return to the surface. Turn left and keep going until you surface in a room with a ladder going up. Pull up out of the water and take the RELAY BOX which is lying here, then climb the ladder to the door you opened a minute ago. Climb up to level 4 and use the relay box in the circuitry on the wall to repair the elevator. Pull the switch to send it down, then jump diagonally to the ledge with the ladder on the right side of the elevator shaft. Pull up, then walk carefully over the glass shards to retrieve SECRET #3, the Gold Dragon (plus 4 sets of Uzi clips if you�ve found all the secrets). On the left is an alcove containing a switch; pull this to open the exit doors. Walk to the exit, retrieving additional Uzi clips on the floor before you leave. Return to the elevator shaft and pull the switch to bring the elevator back up. Pull it again, then jump aboard to ride down to the ground floor. When the doors open, run out and take out the 2 thugs ready to ambush you. Take their 2 boxes of shotgun shells. Now pull the switch to send the elevator up, and jump in the water below. Facing the ladder, swim to the left, left, and left again. Surface and grab the CIRCUIT BOARD. Return to the elevator shaft opening to get some air, then swim to the left, then right, into a room with many short pillars. On the far right wall is a lever that opens the nearby gate. Pull it and exit. Climb out onto the yellow carpet where you killed the rat earlier. Climb up to level 3. Now go to the locked doors at the back of the room and use the ornate key to open them. Jump into the doorway. You�ll find yourself in the room below the lighting booth. Push the button to open the gate, then climb into the booth. Place the circuit board in its receptacle and use the switch on the right to raise the scrim on the stage. A thug will come out onto the stage to see what�s going on. You can take him from up here or move in closer. Go to the stage, killing the dog and the 2 additional goons who come out when you get there. Watch out for the falling sandbag to the left of the doorway. Take the shotgun shells and small med-pack from their previous owners before going on. In the room behind the stage you�ll see a few dozen wooden crates, one of which moves. Pull it out and flip the switch behind it to lower the scrim again. Climb up the boxes, through the opening and onto the white ledge above the stage. A thug comes out to patrol below, so shoot him from here, but be careful of the falling sandbag on the left side of the platform. When he�s dead, head to the right (when facing away from the opening), jump over to the wood area and go down into a small room with a hole in the floor. Jump and grab the edge of the opening above the hole. Flip the switch here to open a small door below. Rather than try to jump or run past the bag, stand in the alcove with Lara�s feet about one step back from the edge and jump diagonally to the slanted edge. You�ll slide down to the flat spot out of the bag�s way. From here, time a run past the bag, staying to one side. Below is another room full of crates. Rather than jump down into a melee, take a very carefully timed running jump past the swinging crate to the stacked crates on the right. From here you should be able to take out the super-tough thug and the 2 dogs. Now drop down and take care of another bad guy who comes out of hiding. When the coast is clear, recover 3 pairs of grenades, a small med-pack and some Uzi clips. Climb up on the low box at the far end of the room. Make your way over the tops of the crates, avoiding the swinging ones, back to the end where you entered. To the right of the entrance is a switch on the wall which opens the exit door. A bad guy will come out, but you can kill him from up here if you�re patient. Take his Uzi clips and head for the exit. You might take a moment to admire the view of Venice at night before sneaking aboard the seaplane and ending the level. Now comes a cut scene in which Lara overhears Marco Bartoli talking with one of his henchmen. Unfortunately, you and Lara don�t get to hear the end of the conversation. Now a short video of the plane landing just before Lara comes to in the next level.
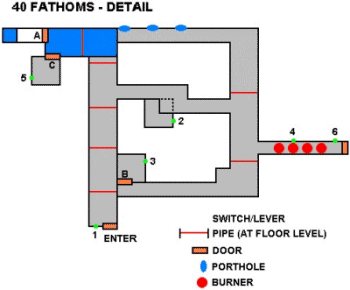
Kills: 20 Items: 21, plus Pistols, Auto Pistols, Harpoon Gun, Shotgun, Uzi's, Yellow,Red & Green Key Cards. Secrets: 3
You begin this level imprisoned in a room full of crates. The bad guys have confiscated all your weapons. There�s a wall of windows and next to them a locked door. Fortunately some of these crates move, revealing a passageway in the back left corner. Here�s the switch that opens the door. It�s timed, so pull the switch, press Look, then roll and run out, be sure you�ve cleared a path. Alarms will start to go off and the guards will be here in a moment, so dive into the water and swim over to the other side of the plane before surfacing. Just be careful not to venture too close to that huge fan. Any closer than the barrels on the bottom and you�ll get sucked into the blades. Down on the left side of the fan is a lever. If you�re careful you can approach it from the side and pull it to open a door on the other side of the fan. Go around the barrels and stay close to the wall as you approach. You�ll have to swim holding the right arrow key to make it past the fan into the opening without getting shredded. Follow the underwater passage until you can surface. On the wall underwater, just below the opening where you just came in, is a lever. Pull it to open a trapdoor back at the fan end of the tunnel. Now you can swim back, go down through it and grab SECRET #1, the Jade Dragon. Return through the underwater passageway to the room with the lever and climb out. Follow the passageway until you emerge outside. Head to the right, jumping the gap and avoiding spending more than a moment in front of those windows. The guards may see you and attack. Drop down at the end of the walkway and push the button on the wall to open the hatch under the plane. Swim underneath and climb inside. Press the button to turn off the engine. Return to the dock by the windows. This time, go to the end of the black walkway with the broken railing at the end. Run and jump off this walkway and grab the airplane wing next to the propeller. Pull up and go over the top of the plane to a trap door which opens when you step on it. Grab the PISTOLS and head up the ladder. Now you can return to the landing where you escaped. Come in from the right behind the wall, so the guards don�t see you before you see them. Pull up and head for the door on your right. Two guards rush out. Take care of them and grab a large med-pack and the YELLOW PASS CARD. Enter the door they came from, avoiding the ramp with the barrels. They�ll come rolling down if you step on the ramp. Follow the passage to a room where you can use the pass card in a YELLOW LOCK to open the door. Enter the room and press the button to turn off the alarm. Follow the passage to the right. Turn the wheel to open the door. Take care of two rig workers who attack. One has a small med-pack, the other has a large med-pack. The door at the top of the ramp closes when you approach, so use the door with the wheel to enter the bunk area. Another guy comes out. Kill him and take his large med-pack. Go into the lounge and pick up 2 bundles of harpoons and 2 pairs of auto pistol clips. Go into the bunk area. The guys have kindly left some goodies on their beds - AUTO PISTOLS and clips for them, a HARPOON GUN and 2 bundles of harpoons. There�s a trapdoor in the ceiling between the last two bunks that opens when you push a button in the first top bunk on the left. It�s on a timer, so you�ll have to rush. Push the button, then roll, run to the last bunk on the right, jump and pull up, roll, walk up to the edge, jump and grab the opening then pull up. Follow the passage to the slope. Slide down backwards and grab the edge. Climb down the ladder to the bottom. The two blocks at the left side move, so pull out the one on the right and push it over to the other side of the room. Now pull the other block out, pull it once toward the middle of the room, then get behind it and push it up next to the platform with the burners. Do a running jump off the block and grab the ladder above the flames. Climb to the top. Follow the hallway, killing the guy who attacks, and taking his RED PASS CARD. Continue until you see a ladder on the left. Climb to the top and retrieve SECRET #2, the Stone Dragon. Climb back down and proceed up the stairs. You�ll end up at the small, water-filled room where you were earlier. Go outside and re-enter the room where you used the yellow pass card, shooting out a window to get in. Go into the next room and this time take the left passage. A rig worker and a dog greet you. When they�re dead, take the guy�s Uzi clips. Start up the ramp, jumping off to the side to avoid the rolling barrels. At the top, use the red pass card in the RED LOCK to enter the door. Three rig workers try and stop you, so take care of them and take a small med-pack, shotgun shells and some flares from them. Alarms will start ringing, but there�s nothing you can do about them this time. Climb on the platform to the left. Find the moveable block in the corner and push it once. Go around to the opposite side and pull the block out once. Go back behind it and push it once more. Now you can do a running jump to grab the edge of the block, pull up and jump and grab the ledge above. When you turn the corner a thug starts shooting at you, so kill him and take his shotgun shells. Enter the room and use the switch on the left wall to flood the first of two pools in the room outside. Go back the way you came, then swim across the pool to the area with the yellow tank. Jump over the ducts onto the metal surface. Jump up the ramp and pull the switch to open the trapdoor in the last room. Go to the trapdoor and jump in. Follow the passage, slide down the ramp and take a look around. You can�t see them all from here, but there are 7 bad guys in this big room. Head to the right end of the catwalk and look around. Draw the pistols because Lara can see the 2 scuba divers in the water better than you can. She can probably take out both from up here. Now, go all the way to the left end of the catwalk. Do a running jump and grab the catwalk opposite. Again to the small platform ahead and a bit to the left. Jump to the small platform to the right, then to the next catwalk. Immediately take out the guy on the next platform over. Jump over to take his SHOTGUN and kill the thug on the next platform over. Jump over to where his body is, take the shotgun shells and look for another thug on the catwalk beyond. You should be able to get him from here. Do a running jump to the catwalk on the wall beyond the footings. Run and jump diagonally to the catwalk where the last bad guy fell. In a glassed-in cabinet on the wall is the GREEN PASS CARD. Shoot out the glass and take it. Jump down into the water and climb out on the footing where the dragon is. Two guys rush you, so you�ll have to kill them to take SECRET #3, the Gold Dragon (plus the UZI'S and 2 sets of clips if you�ve found all secrets). You�ll also get a small med-pack. Swim to the footing in the far corner of the room. Climb out and jump to the ladder on the wall. Climb up and make your way back to the catwalk with the doorway above. Climb up and follow the passageway up to a ladder. Climb it and continue until you can drop down. You�re now back at the trapdoor room, and a rig worker with a small med-pack is blocking your way. Take care of him then go in, use the switch to drain the first pool and fill the second, then use the green pass card in the GREEN LOCK to open the door. Jump into the pool, swim through the opening on the far side and down a long passage. When you reach the grate, pull the lever to open it and continue until you can surface. Head up the stairs to the next level.
Kills: 34 Items: 31, plus M-16, Blue Key Card, Red Key Card, Machine Chip #1, Machine Chip #2 Secrets: 3
Continue up the stairs to a large, water-filled room. Don�t go in the water yet, or you�ll be sucked into the huge fan. Instead do a running jump and grab the ladder on the opposite side of the room. Climb up and follow the passage to the switch that turns off the fan. Return to the water and swim behind the fan and down a tunnel to pick up 2 pairs of grenades. Return to the main pool. Find the lever on the left side and pull it to open the door on the landing ahead. Climb out of the water and follow the passage. When you enter the room, two thugs and a dog charge from the left. Take care of them first, and then turn your attention to the two men on the other side of the pool. Make sure you at least take out the one with the gun. The other can wait until you get there. The two on this side are carrying shotgun shells and 2 sets of Uzi clips. Stand at the edge of the water, facing the right block. Do a standing jump and grab the edge as the hook begins to swing away. Shimmy right and pull up out of the hook�s way. Turn and when the hook moves away, do a running jump to the other platform and grab the edge. Pull up, turn and do a running jump to the other side. There�s a stairway at the other end of this room that leads to the water, so you can swim up and climb out if you miss any of the jumps. Kill the second guy if you haven�t already, and then take the small med-pack and flares. In the next room, slide down the long slope at the centre backward to land in a small opening. Grab SECRET #1, the Stone Dragon. Pull up out of the opening and slide the rest of the way down, jumping at the last moment (without grabbing) to land on the platform above the pool of toxic waste. Follow the passage to the left to an extremely long ladder. Climb all the way to the top and continue to a room with an opening in the floor. Pick up some auto pistol clips and 2 sets of M-16 clips. Hang and drop into the opening to slide backwards down the ramp below. Grab the end, release and grab the ledge below. Pull up, kill the guy who�s waiting here and take 2 sets of auto pistol clips. Follow the catwalk to the left until you come to an opening in the railing. From here back flip from the edge to land on the small platform below. Take the BLUE KEY CARD. Jump to the floor then climb up into the opening to the left. Follow the passage up to an opening. Do a running jump and grab the ladder, then return to the catwalk the way you came before. This time, go right to the door with the blue lock. Use the card to enter. The next door opens automatically. You�re now in a square hallway that goes around a large central room. Around the corner to the right are 2 dogs. A guy and 2 more dogs lurk around the corner to the left. Head to the right and take out the two dogs first then turn around and shoot at the dogs and flame-thrower guy as they approach. The doors to the central area don�t open yet, nor do two of the doors on the outer rim of the hallway, so begin at the door farthest from the door where you came in. Use the wheel to open it, then head down the stairs. A thug greets you, so take him out. You�re now in a room with a pool that has a block and tackle above it and a whirring saw on the other side. There are 2 goons in a glassed-in office. They won�t come out until you open the door later on. Push the box to reveal an electrical panel in need of a chip. Jump in the water and head for an opening down and to the left. A scuba diver lies in wait, so harpoon him or swim back to the edge, climb out and take care of him from there. Take a deep breath and head down that underwater tunnel. Here�s the sequence: Enter the passage, swim right, then keep going straight. Pull the lever to open one of the grates, reverse, and go to the right through the open grate, right and right again. Pull a second lever, which opens a door elsewhere, and then continue on until you can turn right and right again. This grate opens automatically as you approach. Swim through, turn left, left again, and surface where you started. Exit the water and go back up the stairs to the big square hallway. Go left to the other door with the wheel. Enter and head up the stairs. Three goons try and stop you, so take care of them and keep going. Unfortunately, you�ll just miss the helicopter taking off. Search the bodies to get auto pistol clips, shotgun shells and a large med-pack. Cross the helipad to the control room beyond. Here are two burners with a trapdoor between them. The switch on the right turns off the first, the button on the left turns off the second. Pull the switch, run to the trapdoor and drop down. Grab the M-16 RIFLE and some clips and hurry back out. Now the full sequence: switch, side flip, side-step, button, side flip, run and jump over trapdoor, pick up the MACHINE CHIP at the end of the passage, roll, run and jump over the trapdoor and out. Return to the room with the pool and saw. Place the chip where it belongs to open the nearby door. In the next room, take out 2 thugs�one is lurking behind the big yellow tank to the left. One of them has a small med-pack and there are 2 bundles of harpoons on the floor to the left. The silver door across from the entrance opens automatically when you approach. Go in and push the button that opens the grate at the bottom of the pool. Swim down to SECRET #2, the Jade Dragon. An underwater tunnel leads to the left. When you enter, 2 scuba divers appear. Kill them, get some air and follow this passage until you can surface in a large room. Far below is a small submersible, which you�ll be seeing again. There�s one small ledge you can climb out on. From here, shoot the 2 goons. Climb up behind you and pull the switch to open the control room door back in the room with the saw. Before you jump back in the water, look for another scuba diver. You may be able to shoot him from above. Return to the saw room and take out the 2 who are now running around loose. Get their small med-pack and Uzi clips. Enter the control room and use the switch to move the block and tackle. Use the dangling cement block to leapfrog over to the area with the saw. Note the red card near the blade. Go behind the crates in the corner and press a button, which raises a duct in the helipad area. Return there, taking out the 2 goons and 2 dogs that meet you at the stairs. Search the bodies for shotgun shells and Uzi clips. Drop down into the newly opened area; go through the doorway and drop down into the room below. There are 2 more goons here who are not very happy to see Lara. When they�re history, take the MACHINE CHIP. Note the door with the red lock here. Return to the saw room and use the chip to turn the saw off. Retrieve the RED KEY CARD and bring it back to the red lock. A thug waits below. When he�s dead, continue along the passage until you can drop down. Here are the 2 guys you killed earlier from across the water. Take their small and large med-packs, along with 2 bundles of harpoons left lying on the floor. Exit through the other door. Follow this passageway. You�ll get a little audio of the evil Bartoli interrogating a monk, whom you�ll meet momentarily. Enter a room, taking out the 2 guards from the catwalk. Before approaching the monk in the centre of the room, enter the room to the left, where you�ll find SECRET #3, the Gold Dragon (and a bonus of 4 sets of Uzi clips if you�ve found all three secrets). Approach the monk for a cut scene, in which Lara chats with the monk while changing into her wet suit then makes a harrowing escape.
Kills: 16 Items: 11 Secrets: 3
This level begins with a movie. Lara hitches a ride on the submersible and winds up stranded at the bottom of the sea. Turn around and swim toward the left, following the trail of junk on the sea floor to a sunken ship, and avoiding the great white shark. At the far-left end of the wreck you�ll see the anchor sticking out the top. Behind it is an opening. Swim inside, surface and get some air. Two sharks will follow you in. Harpoon them then go through the large underwater opening on the right. Swim up and through a small passageway on the left. In the next room at the far left is another small opening. Go through this opening and head for the back left corner. Pull the lever that opens the trapdoor. Go through the trapdoor, then into the next room where you can climb out of the water. Swim through the opening behind the stack of crates. Pull the switch, which drains the water from the previous room. Return and use the crates to climb into the opening at the top. Drop down into the next room, taking care of the goon and avoiding the four centre squares, which are actually a trapdoor to the room below. When the goon is dead, take his shotgun shells and SECRET #1, the Stone Dragon. Now drop through the floor, kill the 2 thugs waiting below and grab their small med-pack and harpoons. Use the wooden blocks to get into the opening high in one corner. First, go for the secret in the water outside.
The switch (1) on the wall to the left as you enter this area opens a door at the far end of the passage and to the left (A). The door is on a timer, so flip the switch, press Look, then roll, and run down the passage, jumping over the floor level pipes. Once you�re inside the door, it�ll stay open. At the end of this short passageway is a hole leading to the outside. At the end of the passage is an open area. SECRET #2, the Jade Dragon rests on the sea floor to the left. A shark and 3 barracudas stand guard. Kill them if you want all the kills. When you�ve grabbed the dragon, return the way you came. Now you�ll need to get past the series of burners to the door beyond.This is nasty; so make sure you�re well rested. Now the moves: Begin at the switch in the room above the narrow hallway (2). Flip the switch and head for the room you just opened (B). Once there, flip the switch (3), look, roll, and run like mad to the burners. Flip the switch here (4), look, side flip to the left twice, then run like mad to the next door (C). Flip the switch here (5) to turn off the second set of burners, then run back to the room (B) with the switch (3) that turns off the first burners again. All the burners should be off now, so run through to the end. Now you can breathe deeply and pull the last switch (6) to exit. The room beyond contains a pool. Take a dip to draw out a barracuda, then shoot it from above. Swim down then up through a trapdoor. Head up through the next two openings. In the top area find the lever and pull it to open a door at the bottom. Head down into the opening you just made, and pull another lever to open the hatch at the very top. In an alcove near the lever is SECRET #3, the Gold Dragon. (The bonus for all three secrets is 4 bundles of harpoons.) You can get it now, or surface for air first. Three more barracudas appear, so swim back to the top, get out of the water and take care of them. Follow the passage from the water and drop down into a big room full of dirt. (On a shipwreck at the bottom of the ocean???) Continue down through another opening into an even bigger dirt-filled room below. Find the moveable crate and pull it to climb into the opening above. Pull the switch here to open the trapdoor above and dump a lot of dirt into the big room. Return to the big room and look for two small openings along the left wall. Go up through the one on the left. From this room, continue up through an opening in the ceiling. Pull the switch here to flood a room elsewhere. Return to the lowest room and up through the right opening of the two next to each other. Climb through this room to the one above and flip a switch to open a door in the room you just flooded. Return to the lowest room and climb over to the far-left wall, beyond the open trapdoors. Enter a winding passageway and follow it to the end. Jump in the water and head for the door. A scuba diver lies in wait. Kill him. Go through the passageway he came from, and climb out of the water to find yourself under attack by 2 goons. When they�re dead, lift a large med-pack and shotgun shells, plus 2 bundles of harpoons lying on the floor. Pull the switch to open the door and exit the level.
Level 08: WRECK OF THE MARIA DORIA
Kills: 32+ Items: 31, plus Grenade Launcher, Restroom Key, Rusty Key, Cabin Key, Circuit Breaker #1, Circuit Breaker #2, Circuit Breaker #3 Secrets: 3
Jump into the water, kill the scuba diver who emerges from the underwater doorway, then grab 2 bunches of harpoons from the bottom. Get air and follow the passage where the diver came from until you can climb out of the water. Take the large med-pack and use it if necessary to get your health up to 100%. Slide backwards down the slope and grab the edge. Then drop through the broken tiles to the floor below. You�re now in what was the ship�s swimming pool, only it�s upside down. Two thugs, are your welcoming committee. When you�ve killed them, take 2 small med-packs and some auto pistol clips. Go through the doorway opposite into a tiled room with columns. In one corner, behind a couple of chairs is an opening in the ceiling. Climb up into the dark passageway above and take out the bad guy. Continue until you can drop down and pick up SECRET #1 The Stone Dragon. Immediately look up into the opening because another thug is lurking up there waiting to shoot you. You can kill him from here. Go back to the tiled room the way you came. In the corner are several moveable blocks. Pull the block on the right out once, push once, then go around and push it twice into the alcove. Go back to the corner and pull the left block out. Pull it to the side to reveal an opening behind. This leads into the restroom area. Pull the remaining block out twice to access another passage, this one to the ballroom. Head for the ballroom first. Kill the 3 thugs on the ground, taking care not to step on the broken glass. Then take out their buddy on the balcony. The ones below have flares and a large med-pack. Before going up to the balcony, go behind the wall to the left of where you came in. Walk carefully over the glass shards to an opening in the floor. Turn around to face the way you came, drop and hang, then release the Action key and press it again to grab the ledge below. Pull up into a short passageway to get the REST ROOM KEY. Do a standing jump from the passageway to grab the opposite edge of the opening and pull up. Return to the restroom and use the key in the lock in the far right corner. Enter the door on the left that you just unlocked and push the button, which opens the glass doors on the other side of the room. A thug comes out. Once he�s down, go through the doors he came out and press the button there to open the small, high door in the ballroom. Use the restroom button again to close the glass doors. Return to the ballroom and go to a low ramp on the right at the far end. (There are two angled bits of floor here; you want the second one.) Walk to the highest point then jump up and grab the balcony. Go to the right near the wall, drop and hang from the edge then traverse left. Pull up and take the auto pistol clips from the sniper you killed earlier. Continue to the far end near the glass on the floor. Run, jump and grab the edge of the balcony opposite. Pull up and take the 1st CIRCUIT BREAKER. Head back across the balcony level to the door you opened a few minutes ago. In this passageway are 5 doors: a locked door (A) on the right, opposite a door with a wheel (B) on the left, and beyond these another door with a wheel (C) on the right opposite a sealed door (D) on the left. At the far end is another sealed door (E). You can go into B if you like, but it�s empty. Use the wheel to open door C. Inside is a small room with 2 moveable boxes, a switch and a high door. Move the lower block under the switch and pull it to open the door above. Pull the second box under the door to climb out. Follow this passage as far as you can, shooting the guy who tries to stop you. In the room at the end, move the box under the lever, which opens the door (E). Pick up the RUSTY KEY from the floor. Use the key to open the locked door (A). Drop into the room. Pull the block in the corner next to the metal step. Pull the other block out of the wall, so you can get behind it. Push the block you find there twice to open up a passageway. Proceed to a room with broken tiles on the floor. There are lit burners below and rolling barrels in the area beyond. Step onto the tiles at the left side then hop back. This triggers the barrels, so you can then run over the tiles on the right to get across safely. At the top of the slope where the barrels came from is an opening. More barrels will roll down when you enter, so back flip then either side flip out of their way or move forward to the wall so they roll overhead. At the end of this passage is SECRET #2, the Jade Dragon. Go to the opening to the right of where the barrels landed. You may be able to kill the gunman inside before climbing in. Drop down to the floating platform below. Find the underwater lever and pull it to open the side door above. This is on a timer, so climb up quickly. The door closes behind you, but the switch opens it again. The other door opens automatically when you approach but closes behind you after you pass. Beyond is an angled floor with a trapdoor. Slide down backwards and grab the edge. Pull up and the trapdoor closes and locks behind you. Now you can stand on it and pull up into the opening. Pull the switch here to open a blue panel off the room with the floating platform. Return to that room and go through the other opening to the opening you just made. Three thugs wait in the next room. One is just inside the doorway. The other two are on the level below. Below, what was once a glass ceiling is now an opening to the shark-infested waters. When you�ve killed all 3 gunmen, find a button on the wall. This opens a timed trapdoor to the right. Run all the way around the perimeter then do a running jump through the opening. Collect the 2nd CIRCUIT BREAKER, plus a small med-pack from one of the bodies, and press the button on the wall to drain the flooded room above. When you step on the corner floor tile near where you picked up the circuit breaker, another timed trapdoor opens on the far side of the room. Run to it and pull up. Return to the now drained room and drop down. Open the door with the wheel, head up the ramp and pull up into a passageway. Go straight and then drop down into the glassed-in passageway in the restroom. Take the 3rd CIRCUIT BREAKER. Return past the glass double doors and press the button in the corridor to open a trapdoor in the passageway above. Go back up into the passageway, and enter the lounge through this trapdoor. Take care of the 2 thugs, grab their Uzi clips and 2 bundles of harpoons, and then go back to the swimming pool area where you entered the level. Go into the water-filled passage in one corner. Grab the small med-pack in the water and follow the passage until you come to a lever. Pull it to open the trap door above, and surface under fire. When you�ve dispatched all 3 thugs, take their large med-pack, 2 boxes of shotgun shells and some Uzi clips. Replace the 3 missing circuit breakers to turn off the burners. Now you can pull the block under the opening and climb up. Kill the guy with the wrench. Pull the switch to flood a room on the other side of the one below and flip over the ducts in the large room so you can climb across them. Do a running jump from the opening to the duct opposite, then two run-jump-grab combos across the next two ducts and a standing jump to the opening. Swim down and forward, and surface in a room with flickering lights. Wade into the water ahead to draw out a barracuda, which you can then kill with pistols. Wade back into the water and go to the right to find an alcove with 2 bundles of harpoons. Swim to either of the two openings on the left, climb out, kill the goon and take his small med-pack. You�re now on the ship�s bridge. If you look carefully out the windows, you�ll notice a key on the sea bottom. In the passageway behind the cabin (room with 4 rectangular windows) are 2 sets of auto pistol clips. Go through the door that opens with a wheel. Pull the switch to open another door at the opposite end of the bridge. In this room are some flares and a moveable block. Push the block to access another switch. This opens a trapdoor to the left of the room with the wheel door. Now you can jump in the water and swim out to retrieve the CABIN KEY. To find it, swim straight from the trap door, turn right through a stone opening, then right again around the hull. You can try and kill the 2 sharks and 3 barracudas that get in your way, or just out-swim them. The key is on the bottom near some small plants. If necessary, return to the trapdoor to get air. In addition to the key, there is a cave opposite the trapdoor opening. To get to it, swim across and up. Inside you�ll find SECRET #3, the Gold Dragon (plus 2 pairs of grenades and the GRENADE LAUNCHER if you�ve found all the secrets). Return to the bridge and use the key to open the cabin door. Pull the switch here to open a trapdoor in the bridge floor. Now you can push the block under the switch. This switch opens the trapdoor in the cabin. Follow the passageway above to a large room. There are 2 bad guys on the level below and 2 scuba divers in the water below. You should be able to shoot the guys with guns from above. When they�re dead, drop down through the open floor to the flat block at the corner of the opening to the water. Take the M-16 clips and small med-pack from the goons, and retrieve 3 sets of M-16 clips from the dark alcove. You can kill the 2 divers from above if you like; though you may have to jump into the water and climb out to draw them out. When the water is safe, dive in and go through a passage hidden behind the barrels on the sea floor. Kill the barracudas if you like, or just avoid them and the eels in the passageway, and follow the cavern to a metal opening. This is the end of the level.
Kills: 21 Items: 12, plus Theatre Key Secrets: 3
You begin underwater where you left off a moment ago. Swim through the metal arch and around to the left. A lever here opens a trapdoor in the hull on the opposite side of this area. Enter the hull and shoot the guy who comes out to meet you. Take his small med-pack then go through the doorway he came from. You�re now in the Maria Doria�s engine room. Go to the doorway at the opposite corner of the room and follow the passageway, killing 2 thugs on the way and taking their auto pistol clips and harpoons. Turn left, jump over the barrels that come rolling toward you, and kill another bad guy. Note the lever high on the wall next to where you came in. This opens the door at the top of the ramp, but you can�t get to it yet. For now, go to the top of the ramp and face the burners. Do a running jump, grab the crevice and traverse to the right over all the burners. Drop down and pull the switch here to put out the burners. Go through the opening above and to the left. Continue until you reach a room with a switch. Pull it to change the positions of the pistons. Drop down through the opening in the floor to return to the engine room. Climb up at the right and do the jump-grab routine across the pistons. A guy is waiting in the room at the end, and you may be able to take him from here. Before jumping to this doorway, do a running jump to the ledge on the right to recover SECRET #1, the Stone Dragon. From there, run, jump and grab the sill of the doorway. Kill the bad guy if you haven�t already and take his auto pistol clips. Follow the passageway until you come to a moveable block. Push it as far as it goes. Enter the opening on the left and push this second block as far as it goes. Return to the first block, and pull it out twice. Go around behind it and take 2 boxes of shotgun shells. Drop down to the room below and use that lever again to move the pistons back as they were. Return to the doorway where you shot the last baddie, and jump across the pistons again to the other side. Do a running jump and grab the edge of the alcove to the right. Pull up and throw the switch to flood the burner room. Now that it�s underwater, you can swim to that lever and pull it to open the door at the top of the ramp. Go in then down through an opening in the floor. Kill the scuba diver and swim up into a small air-filled opening next to the one through which you came in. Swim through the blue opening with the seaweed growing in it. Hug the left wall to avoid the hungry eel and you won�t have to waste harpoons killing it. Pull the lever to open the trapdoor in the ceiling just outside this cave. Re-enter the ship there. A thug is lurking on the duct above, so kill him before proceeding. Do a standing jump from the raised area in the centre to grab the duct, pull up and head up the slope. Find the moveable box then pull it so you can get behind it. Drop and hang from the duct where the box was, traverse left and pull up. Turn around and do a standing jump to grab the ledge ahead. Follow the duct to the end, slide down and proceed until you can jump across to a doorway. Follow the passage until you come to a room. Kill the goon waiting here, and then take the first right. Here you�ll find SECRET #2, the Gold Dragon, in a glass-lined pit. Stand at the edge of the opening facing the dragon and press Action + Roll to jump in past the glass. Now retrieve your prize, climb up and go around the corner. Slide down the slope, jumping at the last minute to sail over the broken floor with glass below. Notice the music...notice the Jade Dragon on the sea bottom outside the window. Continue to a wet place on the floor. There are 2 barracudas here. One you should be able to kill right off with pistols. The other you may have to lure out. One square here will break away when you step on it, opening up an underwater passage. Swim out and get SECRET #3, the Jade Dragon (along with 4 sets of M-16 clips if you�ve found all secrets). Return to the ship and continue on. When you come to an angled block, jump to the breakaway floor below it. There�s nothing nasty beneath this time. Now jump out on the other side. Across from the angled block is a wall you can grab. Stand on the step next to the slide, facing the wall. Take 3 side steps to the right. Side flip onto the angled block, slide, and jump and grab the wall. Traverse right until you can pull up and jump down on the other side of the wall. Go through the door and kill the goon on the landing to your right. Head up the ramp to the next room, and take out the guy below and to the left. Don�t go down yet. First go to the back of this room and pull a moveable block to open up a hallway below. Now jump down to the tiled area and kill the 2 thugs that emerge. Continue to the far end of the room, where you can jump down into a depression with a moveable box. Pull it out, then climb on top to shoot a thug who emerges. When he�s dead, go behind the box and pick up the THEATRE KEY. Return to the hallway you un-blocked earlier and follow it to the end. Kill the guy who comes down the stairs, then go back and unlock the theatre doors. Inside is one baddie on the floor and 2 more thugs in box seats up on the right. You can shoot one of the guys in the box from below. Jump over and kill the other, take some Uzi clips and use the switch to open the curtain on the stage. A guy is waiting behind the curtain, so take him out, and then pull the crate under the opening to climb up. Drop down into the room behind and go to the far end, avoiding the pit with glass shards. Push the button to flood the area where you found the theatre key. Return to that area, killing the guy who tries to stop you and taking his shotgun shells. Swim across the flooded area to the doorway and finish the level.
Kills: 30 Items: 28, plus Stern Key, Cabin Key, Storage Shed Key, The Seraph Secrets: 3
Go to the right and take out the 2 bad guys. Pick up the small med-pack one was carrying, and then go around to the other side of the deck to grab 2 pairs of grenades left lying on the ground. Return to where you came in; climb up into one of the windows and dive into the water below. There are 2 barracudas in the water so, harpoon them or look for a flat place to climb out on the left then use your pistols. Climb the rocks around the perimeter of the water to get the STERN KEY. Jump in the water, go through the underwater tunnel and follow the passage until you can surface. A goon is waiting, so take care of him. Head down and to the right, taking out the guy in the next alcove from a distance. Note the trapdoor here, but for now continue around the hull to the left. Here you�ll find some moveable crates. Push the left crate against the others. Climb on it to push the upper crate on top of the rightmost crate. Pull the left crate out again then push it as far as it goes. Pull the remaining crate once to reveal the stern door. Take the flares on the ground and unlock the door. Swim down straight-ahead then make a sharp U-turn to the right. You�ll see a lever on the wall. Pull it to open a trapdoor elsewhere. Return to where you just killed the guy with the flame-thrower. Another live thug waits. Kill him and take his shotgun shells before dropping down through the trapdoor. Follow the passage to a ladder. Climb up and pull the switch to drain the water from the stern area. Go back there and find the moveable crate. Pull it out to reveal an opening. Follow this passage past the propeller until you come to a large underground lake. In the middle is a raft with some crates on it guarded by 2 scuba divers. You can kill them with harpoons or swim past them and head for a landing on the left. Pull up here, kill the guy then shoot the divers from dry land. You can�t climb into the raft from the water, so even if you�ve killed the divers in the water, head for the ledge now. Take 2 sets of Uzi clips from behind the crates here. Then climb over the rocks on the other side of the landing until you come to a rock bridge. Look down in the water to the right and you�ll see something shiny amid the seaweed. Dive down to get SECRET #1, the Stone Dragon. There�s a small opening in the rocks under the stone bridge that you can swim through to get back on the shore. Be careful of the barracuda lurking nearby. Once you�re on land again, enter the cave opening and follow the passage. A guy tries to stop you, so kill him and take his shells. Bypass the opening on the left for now. This leads to the top deck. Continue straight ahead until you come to an opening in the floor with a large med-pack nearby. Get that health meter up to 100% then hang and drop through the opening onto the raft below. Take the CABIN KEY and 2 bunches of harpoons. Two sharks come out and will begin to circle in the water below. You can take them out with pistols from here or do it the hard way with harpoons. A third shark will come out if you swim toward the stone bridge. You can kill him as well, or avoid the issue by climbing over the rocks. Return to the cave and take the left passage this time to emerge near the top deck. Two baddies will come out when you start exploring. Kill them and take their flares. Also take 2 pairs of grenades left in a depression at the far side of the deck from where you came in. If you go down the steps ahead, you may be able to kill one of the 2 thugs on the deck below. Also on the deck below is a guy with a flame-thrower patrolling near the swimming pool. Take him out from up here if possible before descending. When all is clear, head for the pool. Kill the barracuda then jump in and approach the tiled door in the corner. A scuba diver emerges. Climb out and shoot him, then swim into the opening to find SECRET #2, the Gold Dragon. Before moving on, locate some Uzi clips in an alcove beyond the pool and 2 sets of M-16 clips behind a moveable crate on the other side of the deck. Head for the left side of the deck and try to shoot the thug on the deck below. Then cross to the right side and jump down there. From here, do a running jump to the flat rock with wood on top, and a running jump to grab the metal duct ahead. Do a running jump from the highest part of this duct across the gap to the overturned hull. Cross the hull to the propeller then turn so Lara�s back faces out (propeller on right). Drop and hang from the edge, then release and grab the crevice below. Shimmy to the left until you can pull up. Do a running jump into the cave opposite. Follow the passage to a large cave where you can hop up a steep slope using a series of flat blocks. Take care of the 2 bad guys at the top. One has a large med-pack. Continue to the top of the cave where you can do a running jump to grab the deck roof and pull up. Cross the roof to the right where you�ll see a trapdoor on the roof opposite. Jump over and drop through this door. Kill the thug and retrieve 2 sets of auto pistol clips from the floor. Go around to the exit, which opens automatically. Before leaving, pull the crate nearby to reveal a switch. Flip it to open a door at the other end of this deck. A guy is lurking outside. Kill him, take 2 sets of auto pistol clips off the body, and then go around to the right to find the door you just opened. Here you�ll find 2 sets of M-16 clips on the floor and a locked door. Use the cabin key to open the door. In the cabin are some breakaway tiles concealing glass shards below. Run across them, keeping to one side, to reach the one solid bit of floor. Press the button to open the door opposite the room you just came from, and run back across the other tiles. Kill the thug as you exit, and head for that door. Go up the stairs, then through a cave until you come to a wall with an opening at the top and a high block behind. Stand on the low step and jump to grab the block. Turn around and do a running jump to the opening. From here you can drop down onto the hull and find the STORAGE CABIN KEY. Make your way down to the level with the pool. Go to the right, drop down and repeat the series of jumps to the metal duct. From here you should be able to dust off 2 goons milling about near the crates below. Now you can go for that Jade Dragon. Do a running jump and grab the crevice to the left of the broken glass. Traverse to the right, pull up and walk carefully over to take SECRET #3 the Jade Dragon (with a bonus of 4 pairs of grenades if you�ve found the other two secrets). Make your way down to floor level. (The fastest and safest way I found was back via the pool where you found the stern key.) Cross the cavern to the small storage shed door and use your newly acquired key. Take THE SERAPH to end the level.
Kills: 31 Items: 26, plus Drawbridge key, Hut Key. Secrets: 3
The level begins with a movie: Now that she�s got the Seraph, Lara uses a floatation device to return to the surface, then steals Bartoli�s seaplane and goes to Tibet. Unfortunately, technical difficulties prevent her from landing at the front door of the Barkhang monastery and she crashes in the Himalayan foothills nearby.
Kill the bird then jump up to the opening on the right. Below is a long ramp with snowballs at the top. Slide down, run and jump over the first wave of snow, and then duck into an alcove to the left to avoid the second wave. When the coast is clear, leave the alcove and head down to the right toward where the boulders landed. Note the semi-transparent ice wall. Shoot it out like a window, kill the leopard lurking inside and go into the opening to find 2 sets of auto pistol clips. Now continue up the hill to where the snowballs originated and pull up into a cave. Ahead is another wall of ice. Run up the ramp and jump through the ice. You�ll start to slide, so jump and grab the wall ahead. Climb to the top right and traverse until you�re over the doorway. Drop down and follow this passage to emerge above a small lake. Note the hut and snowmobile in the distance. This is where you�re headed, but first.... Keep an eye out for 2 birds, which will attack at various points in your exploration of this area. Turn around then drop and hang from the ledge. Drop to the ledge below. Hang and drop again to a ledge with a doorway. Follow the passageway to a gap with icicles on the ceiling opposite. Jump into the water and pull up, letting the icicles fall before going on. When you reach another opening over the water, head to the right and climb over the rocks into a passageway. When you come to a fork head left. Slide down a slope to a room with a pond and more icicles. Stay close to the left wall and walk forward slowly so the icicles fall in front of you. Continue until you come out above the water again. Make your way over to the large med-pack: Do a running jump to the flat block beyond the angled one to the left. Drop down to the flat block below and from there, run, jump and grab the ledge where the large med-pack is. Another bird will try and interfere at some point. From the block with the med-pack, jump diagonally to the snowy ledge behind you then climb up the snow to the top. Head for the hut and take out the 2 guys who try and stop you. Take their large med-pack and 2 sets of auto pistol clips. Go up to the smaller of two gates on the right and take SECRET #1, the Stone Dragon. Now steal the snowmobile and head into the cave that has no gate. A gunman gets in your way, so run him over. Pick up his shotgun shells before moving on. Continue to a large room with a number of ramps. At the far end is a cave opening barred by two large blocks of ice. Park the snowmobile then enter the cave through a smaller opening on the left. Kill the 2 leopards lurking there, then move the blocks out of the opening. Return to the snowmobile and get it into position to jump into the cave by following the series of ramps: Go to the centre of the room, then through an opening between two walls on the right. Turn left to get to the bottom of the first ramp. From here, follow the ramps and walls around perimeter of the room counter-clockwise until you�re able to jump the snowmobile into the big cave opening. Continue on, jumping the next large gap using the ramps on the left. Follow the left passage until you come to a chasm with two openings ahead, separated by a stone pillar. Get off the snowmobile and follow the right wall on foot. Pick up 2 pairs of grenades lying on the ground near an ice ladder. Climb up the ladder and pull a switch to open a gate ahead. Two guys come out, so climb down and take care of them. Take their small med-pack and M-16 clips before getting back on your snowmobile. Continue, following the left wall, across the gap and through the gate you just opened. Cross the high, narrow bridge, mowing down the bad guy who stands in your way and his 2 buddies in the next area. The next gap is very wide; you�ll definitely need turbo to jump it. When you get to the other side, climb off the snowmobile and proceed on foot. Walk out toward the right side of the chasm to trigger the avalanche. Jump to the white area, slide down and grab the edge, then drop and grab the cave opening below. Pull up into the cave and take the DRAWBRIDGE KEY. Head through the passage below to a wall of ice. Shoot the thug on the other side. Go into the next room, trip the icicle trap, then pull the switch to open the gate above. Enter the cavern ahead and go to the far corner. In the pit below are 2 pairs of grenades. Three leopards emerge when you enter the pit, so quickly jump back up to the snowy ledge above and shoot them from here. Climb the ice ladder behind the pit. At the top is SECRET #2, the Jade Dragon. Two leopards appear on the ramp opposite. Kill them from here, so they don�t ambush you later. Climb back down the ladder and up the ladder on the other side of the cavern to the top. Get back on the snowmobile and cross the cave, taking care to avoid any remaining snowballs. Continue to the next large cave. Use the key you found to raise the drawbridge. Then cross it on foot. Run/jump across the flat area to the right, avoiding the avalanche. You�ll hear a huge rumbling as the snowy wall gives way in the previous area, blocking the way you came. Continue ahead and to the left to a deep chasm. Jump to the ledge on the left, slide and grab the edge, then traverse to the other side. Continue to emerge again in the room with the bridge. At the foot of the huge snow bank is the HUT KEY. As you approach it, a baddie on a snowmobile comes in through the same door you entered. Shoot him. When he�s finally dead, take the RED snowmobile and head back to the hut. His snowmobile is nice with its guns, but yours has a TURBO. You�ll have to stop at the snowy barrier just past the cave with all the ramps and walk the rest of the way. Unlock the hut and take the 2 small med-packs, 2 sets of Uzi clips and 2 sets of M-16 clips lying on the floor before pulling the switch. This opens the cave gate, and 3 thugs rush out. When you�ve killed them, take their large med-pack, Uzi clips and auto pistol clips, and head into the cave. Continue to a large open area where you�ll meet another guy on a snowmobile. Shoot him. Once the bad guy is dead, walk or ride on until you come to a deep chasm. From the top you can see the Gold Dragon down in a small opening. Jump and grab the left ledge, traverse across and take the ice ladder down. As soon as you drop to the ground, jump to the side to avoid the rolling snowballs. Wait for a second wave of snow, then take SECRET #3, the Gold Dragon (along with 4 sets of Uzi clips if you�ve found all three secrets). Climb back up and keep going on foot. When you reach the next large opening, 2 guys on snowmobiles will be waiting below. Immediately climb on the rock wall to the right and shoot them from there before climbing down. Proceed down the hill to the wall, where you�ll find a moveable block. Push it twice to enter a cave where 2 more thugs are waiting. Another bad guy lurks in the cavern below, on a ledge to the right. Take him out before descending. To get down to the bottom, you can drive one of the snowmobiles over the edge and Lara will jump off landing safely in the water or you can climb. In any case, you�re aiming for a small tunnel in the far right corner. Follow this to the next level.
Kills: 34 Items: 30, plus Main Hall Key, Strongroom Key, Rooftop Key, Trapdoor Key, 2xGemstones, Prayer Wheel #1, Prayer Wheel #2, Prayer Wheel #3, Prayer Wheel #4, Prayer Wheel #5 Secrets: 3
The main thing to know about this level is DON�T ATTACK THE MONKS. If you leave them alone they will not attack you but they will attack the bad guys. Follow the tunnel to the steps in front of the monastery. You�ll arrive to see 2 thugs fighting with several monks. In this case, when the monks have dispatched the baddies, you can pick up a small med-pack, auto pistol clips and 2 sets of Uzi clips. Climb the ladder opposite the steps, killing a crow when you get to the top. Jump diagonally to a ledge to the right of the ladder, then jump across to another ledge. Cross the stone ledge to the rock wall. Kill 2 more crows. On the other side of the rocks, turn so the monastery window is on your left and jump to the angled block above the crevice. Slide and grab, release and grab the crevice below. Traverse left until you can pull up. Shoot out a window and enter a library. Go through the library to a hallway. At the far end are the main doors. Enter the door on the left. Cross the room and climb the ladder to a walkway above the main hall. Follow the walkway to retrieve the MAIN HALL KEY. Retrace your steps to the walkway around the perimeter of the room, then go right and around the corner. Go into a small room. Move to the doorway, then side flip to avoid a rolling boulder. Follow the ramp up to a "T." Step into the hallway, and then immediately step back to avoid another boulder. Pick up the flares and head up and to the left. When you come to the room with a pool, dive in and swim along the right wall, then the far wall, to avoid the strong current that sucks Lara down to the grate at the bottom. Head for a small opening on the far wall where you can surface. From here, drop into a deep well. Follow the dark passageway, timing runs through the 3 clamping metal doors. Climb the ladder to emerge in a room where you�ll meet 2 more thugs. The monk may kill one of them for you, but you�ll probably have to finish the job. When the coast is clear, take a small med-pack from one of the bodies, and then jump up the tiered altar to get the 1st PRAYER WHEEL. When you take it, the burners will light. If you stand above and between any two of the burners, you can do 2 standing jumps to the bottom without catching fire. Return to the next room, where you entered, and find a pair of moveable blocks. Pull the first out of the way. Pull the second out of the wall, then go around the side and pull it once more to reveal a passageway out. Follow the passageway to a ladder, which leads up to the area above the main hall. Climb down the first ladder you came up, go into the hallway and head left. Unlock the main hall doors with the key you found and enter. As you cross the main hall, 3 thugs enter behind you. The monks will take care of them. When they�re dead, take a small and a large med-pack plus some auto pistol clips. Enter the first door on the right. A hallway leads out the other side. Jump over the first of three swinging blades and enter the door on the left. Take the STRONG ROOM KEY and return to the reading room, then the main hall. Exit the main hall by the doors you came in and follow the hallway to the end. On the right is the library entrance. Turn left into a storage room. As you enter, one of Bartoli�s thugs will shoot out the window and a monk will run past to engage him. Another thug will enter through the window as you approach. The monks may kill both of the bad guys, but you can assist if necessary. When they�re dead, take some auto pistol clips, a small med-pack and Uzi clips. Also pick up the grenades on the balcony outside. Use your key to unlock the strongroom door. Inside is the ROOFTOP KEY. Take this and head for the next room on the right. Time a run past the rolling blades and use the key to unlock the door to the roof. Go up the stairs and to the right through the arch with the golden animals. At the end of this corridor is a switch to turn off the burners. The switch is on a timer but it�s not particularly fast, so pull it, hurry to the burners, then do a series of standing jumps over them. Make a left down into a courtyard with several golden trapdoors. As you enter 2 thugs will emerge behind you and start fighting with the monks. Finish them off if the monks fail, and take a small med-pack and some Uzi clips. Climb the ladder on the right side of the courtyard to retrieve some M-16 clips. Return to the courtyard and pull the switch to open two of the trapdoors. Drop into the room below, shoot out a window and take the 2 GEMSTONES. On the other side of this room is a switch, which opens the other trapdoor so you can climb out. Now head up the steps and to the left to a room with a large golden door shaped like a star. Opposite is a niche in the wall between two gold animal statues. Place one of the gemstones in this niche to open the star door. Go behind the star and pull out the moveable block to get the 2nd PRAYER WHEEL. Return to the main hall, cross to the far right corner near the base of the huge Buddha, and go down the stairs. Enter the hallway on the right and go into the first door on the right. Find the first movable crate on the left side of the stack. Go around the left side of it and pull it once. Go behind it on the left and push it next to the doorway. Go back to the stack and pull the second crate out to where the first was originally. Now, pull the first crate once to block the door. Pick up some auto pistol clips. Climb on the crates and pull the top left one on top of the one you moved. Underneath are 2 bunches of harpoons�just what you need now that you�re 500 miles from the nearest ocean. ?). Continue to the room beyond the storage room. Jump over the gold trapdoor and continue to a "T" in the passage. Go right and continue to a stairway on the left. As you go up, 4 thugs appear in the area below, you don�t have to fight them alone. Shoot out the window and jump down into the exercise yard below. Use the switch there to open the door and let the monks in to fight the bad guys. Finish the job if necessary and grab a small and a large med-pack, plus some shotgun shells. Cross the exercise yard and climb a series of ladders to the top of the tower, where you�ll find the 3rd PRAYER WHEEL. Return to the storage room, move the crate blocking the door so you can exit, and follow the hallway to the end. As you cross the room at the end of the hall, you�ll hear gunfire behind you. The monks are fighting with 2 thugs. Assist if necessary, then take the bad guys� Uzi clips and grenades. Return to the end of the hall, then go left into a room with a series of traps: burners, swinging spiked balls and rolling blades. First, stand on one side of the opening or the other so you�ll only have to deal with one of the spiked balls at a time. Approach the flame. It will go out, giving you a moment to time a run into the pit below the swinging spikes. Go underneath as far as you can, then turn around and pull up on the ledge. Stay close to the edge to avoid the swinging spikes. When the rolling blade passes moving left, jump to the burner, which will go out just long enough for you to do a careful run into the pit to avoid the next set of spikes. Continue underneath as far as you can then turn and pull up on the right. Now you�re facing the second rolling blade and the doorway beyond. Before going into the next room, take a little detour to grab a secret. Make a series of runs past the rolling blade into the passageway to the left. There are alcoves you can duck into to avoid the blade. At the end of the passageway on the left is a doorway. Beyond this are 2 sets of clamping doors, and beyond these, SECRET #1, the Jade Dragon. Return past the clamping doors and rolling blade to the room on the left. Take the TRAPDOOR KEY. Follow the hallway up and to the left, and then slide down the slope, into a large pool. Go for a swim. In the far wall, near the right corner, is a small underwater passageway hiding SECRET #2, the Stone Dragon. Climb out of the water, and find the exit back to the hallway. Turn right and proceed back to the main hall. On the far side of the big open area is a gold trapdoor. Use your key to open it and drop down. Follow the passage and climb out in a courtyard. Go to the right and follow the canyon to a large pillar. On the far side of it is an opening with a ladder. Climb up to the landing and go to the right until you come to a wooden bridge. A crow gets in your way on this side and a thug shoots from across the bridge. Kill them both, cross the bridge, take the thug�s M-16 clips and continue. Two more crows attack when you reach a small building. Take care of them, and then climb up the rocks on the right. Do a running jump to grab the stone ledge, then another running jump from there to grab the roof of the building. Drop down into the room below to get the 4th PRAYER WHEEL. Pull the switch to open the door. As you exit, you�ll see a monk in combat with another thug. When the thug is dead, take his shotgun shells and return to the monastery the same way you came. You�ll meet 2 more bad guys on the way. Back at the courtyard, use the switch to open the big doors back into the main hall. Two more of Bartoli�s henchmen have invaded and are fighting the monks inside. Once they�re out of the way, cross the hall and enter the second door on the right side (facing the statue). Climb the ladder and follow the hallway to an opening above the Buddha. Do a running jump to grab the statue�s elbow. Pull up and climb onto the hand. From there, do a running jump to grab the head. Cross the head, then jump to the other hand and from there, do a standing jump to grab the alcove above. Place the second gemstone in the niche to open a trapdoor in the room underneath the statue. Jump back to the hand, drop down to the shoulder, drop and hang from the chest and finally drop into the statue�s lap. Before going down to the floor, go around to the back of the statue where you�ll find a small alcove concealing SECRET #3, the Gold Dragon (and 4 sets of M-16 clips if you�ve located all secrets). Go to the bottom of the statue, enter the room and drop through the trapdoor. Follow the passage to a room with pipes and bamboo-barred windows. Flip the switch near the bamboo pipes to open a door. Enter the room beyond and push the block in front of the water to prevent the pool below from refilling. Return to the pipe room, then slide down the sluice backwards, hang and drop into the now-dry pool below. Find the moveable block in the raised alcove and push it aside to reveal the 5th PRAYER WHEEL. Climb the ladder and return to the main hall. Take your finds to the room to the left and behind the Buddha. Place the 5 prayer wheels where they belong to open the big doors. Enter and put the Seraph in place to open the secret entrance to the Catacombs.
Level 13: CATACOMBS OF THE TALION
Kills: 33 Items: 32, plus Tibetan mask #1, Tibetan mask #2 Secrets: 3
Jump down on either side of the stairs and walk to the opening to avoid the falling icicles. In the next room, along the left wall, is a crevice. Grab it and traverse to the right until you can pull up. Drop down behind the wall to find some flares and SECRET #1, the Stone Dragon. Return the way you came. Turn and slide down the slope backwards, grab the edge, pull up and back flip onto the platform behind. From here you can kill the Yeti lurking below. Carefully trip the icicles above the stairs to your right now, then return to the top of the stairs. Drop down into the pit where the dead Yeti is. Pull the switch to open the door above and let a leopard in. Return to the top via the ladder. Repeat the slide/back flip to the platform, kill the leopard and proceed down the stairs. As you go down the stairs into the large room, 2 thugs will emerge at the top of the stairs behind you. Kill them and take their large med-pack, auto pistol clips and 2 sets of Uzi clips. Cross the room and approach the small doorway on the far right, beyond the pool. Immediately roll and take out the 2 leopards that charge you from behind. Go through the small door and down the ramp to get a small med-pack, before returning to the big room. Above is a long ramp with snowballs at the top. Climb the first flight of stairs and jump to the base of the ramp. Run up the ramp to trip the snowballs, then side flip into the pool. Climb out of the water and go to the rocks near the small opening where you killed the leopards. Go around the back to climb up. Do a running jump to the snow-covered platform opposite, and then walk to the broken tiles with spikes below. Run across the tiles and press Action to grab the ladder as the floor falls away below. Climb to the top of the ladder and back flip to land on the platform behind you. Jump to the top of the ramp and pull the switch to raise the cage opposite. Slide down the ramp. Climb up to the cage and take the 1st TIBETAN MASK. Doing this causes the trapdoor at the bottom of the pool to open. Climb down; drop into the pool, then through the trapdoor. Follow the passageway, jumping over the trench with spikes. Beyond is a gate, which you can open using the mask. At the top of the hill beyond are a bunch of snowballs. A pack of 4 leopards will attack as soon as you enter the area. Ready weapons. Then run up the ramp and side jump to the right to avoid the snowballs and kill the leopards. The main doors at the top of the ramp are locked. Go up the ramp and jump to grab the opening in the left wall. Beyond the opening is a room with a frozen pond and a firepot high above. When you drop down, 2 leopards charge you. Four more leopards will emerge when you approach the doorway on the right, 2 from ahead and 2 from behind. Kill them all. Enter the cavern on the right where there�s a huge wall of ice. Just to the left of the entrance is a rock outcropping. Climb over this into a small cave with water below. Swim down and pick up a 2nd TIBETAN MASK. When you climb back up, 2 thugs will be waiting below. Kill them from the rocks if you can, then take their small med-pack, Uzi clips and 2 sets of auto pistol clips. Return to the main area with the buildings and go around the back of the building with the red trim. Climb the ladder at the back and retrieve 2 pairs of grenades from the ledge. Descend and use the mask to open the door below. There are 4 Yetis in this very dark room. Enter the room and head to the far-left corner. Jump across the gaps to the centre platform where there�s a firepot and a switch. When you pull the switch, the lights go on, the Yeti cages open and grates appear in the gaps between the platforms. Kill them as they charge up the stairs, then jump down to the ground and get the rest as they stupidly take the stairs down. When they�re dead, you�ll find 2 large med-packs, 2 pairs of grenades and 2 sets of Uzi clips in the cages. Go back to the top of the stairs and move the block into the first of the small doorways with the gates above. There�s a pair of grenades on the floor in one of the other doorways. In the room beyond is a switch. Pull it to open the door above the opening to the firepot room. It also closes the four gates, which is why you need to move that block. Head for the door you just opened, killing the 3 bad guys who would try to stop you and taking their 2 boxes of shotgun shells, 2 sets of auto pistol clips, Uzi clips and small med-pack. When you get to the door above the opening in the rocks, run up the wooden bridge and duck to the left beyond the doorway to avoid the rolling snowballs. Continue to the end of the bridge, turn right and do a running jump to catch the ladder. Climb up to a room with an opening over water then dive in. Get out of the water as quickly as you can and shoot the 3 fish that nibble on you. Swim through the next cave. Climb out on the rocky ledge on the right side of the opening into the third cave. Turn around and you�ll see a ladder above you. Jump up to grab it, climb to the top, then do a back flip off the ladder to land on the platform behind you. Here you�ll find SECRET #2, the Jade Dragon. Run and jump to grab the ladder and descend. Go into the last cave. The large doors are closed. Climb up on the block in front of them. Do a running jump to grab the bottom of the ladder hanging from the cave ceiling. Climb up and back flip to land on a ledge behind you. Here is the switch that opens the doors. Enter the room and kill the leopard. Then pull another switch to open the main doors back at the buildings. Go to the platform on the right of the firepot. Do a running jump to land on the slanted blocks below and slide to the ground. Return to the main doors at the top of the ramp. The gap in the floor leads to a room below, where 3 leopards lurk. You can shoot them through the opening. Or, if you�re feeling brave, ready guns and jump. When they�re dead, retrieve some grenades, M-16 clips and a large med-pack scattered around the room. Flip the switch to open the side doors and release a fourth leopard. Return to the top of the ramp, go through the doors and jump across the pit. First, jump up the ramp on the left to set the snow rolling. Slide back down, then immediately side flip to the right. This will trigger the other avalanche. Slide down and either jump over the snowballs as they roll past or run a few steps forward and side flip to the left. Enter the room opposite the first ramp, where the snowball ended up. Here you�ll see two floor tiles that don�t match the others. These are pressure pads that open the doors. First, step on the pad to the left to open the door in front of it. Enter the room, and look to the left. Notice the area of wall that looks different from the rest. You can climb up this wall like a ladder to get SECRET #3, the Gold Dragon (and a bonus of 2 pairs of grenades and 2 sets of M-16 clips if this is your third secret). Descend and walk carefully through the spikes to the door on the right. The remaining door in this room leads to the level exit, so you�ll need to get through it. Stand with the right hand pad in front of you, facing the doors. Turn to the left so you can run over both pads. As you touch the left pad turn and jump into the doorway, jump over the spikes and into the exit door. You may need to practice this. When you are through the door do a running jump to the ladder, climb down & follow the passage to the end of the level.
Kills: 22 Items: 27, plus Tibetan Mask, Gong Hammer, Talion Secrets: 3
Shoot the bell to open the door. In the next room are two cages�an empty one on the right and another high on the left that holds 3 yetis. The odd-looking floor tiles are springboards, which will launch Lara up into the air if she steps on them. Stand in front of either of the 2 adjacent springboards, facing the archway with the gates beyond. Run onto the springboard to launch Lara upwards, then grab the angled ledge above. Climb up and go to the left to find 2 sets of Uzi clips on the floor and a switch. Flip the switch to raise the empty cage and lower the yetis� cage, freeing them. Jump down to the floor below on the right side of the switch and kill the yetis as they come up the steps. Cross the room and retrieve a large med-pack in the far right corner. Go into the cage above and behind the yeti cage, where you�ll find another large med-pack. Another yeti charges as you approach the stairs at the back. Kill it then go up the stairs and pull the switch there to raise a platform beyond the bars. Go back down the stairs and find the moveable block at the back of this cage. Pull it out to gain access to a large room. Line Lara up with the platform and step out. There�s an invisible bridge, which will take you across to the high platform at the other end of the room. Climb onto the platform to get SECRET #1, the Gold Dragon, and then return the way you came. Return to the main room and go to the springboard opposite the yeti cage on the far left. Above is another bell. Draw pistols, run onto the springboard, shoot the bell at the peak of the jump and slide down the sloped wall ahead. Shooting this bell opens the first of the 2 black gates. Go to the corridor where the gates are. Face the ledge you just lowered and run onto the springboard to sail up onto the ledge. Turn around and you�ll see another bell. Stand facing it and jump in place to shoot it. This will open the second black gate below. Jump down to the angled block on the left, slide, grab and drop to the ground. Go through the gates you just opened, turn right and run onto the springboard. As Lara sails up, grab the angled ledge above. Traverse to the right and drop down onto a flat ledge. There�s another bell above and sloped ledges ahead and behind. Targeting this last bell is a bit complicated: Face the bell and grab the ledge in front of you. Pull up then back flip to the slope behind and at the same time draw your pistols. Shoot the bell and slide down to the flat ledge. This last bell opens the gate above and to the left. Grab the sloped ledge below the bell again and traverse to the left. Pull up, back flip onto the slope behind you, then side flip left to land on the flat ledge. Climb the ladder to the ledge above. Climb into the opening and jump across the gap to the floor. Kill the yeti that charges through the other opening then take the flares. Note the Stone Dragon behind the barred window. To get it, climb through the opening where the yeti came in. Head down the passageway, killing the tiger you meet. When you reach an opening on the right, enter then climb into the dark opening above and continue until you reach SECRET #2, the Stone Dragon. Exit this tunnel and take a running jump across the gap to a ledge. Off to the right is a small med-pack. Return to the path below. This time, continue straight then to the left. When you reach the room, 3 tigers will charge. After you�ve killed them, take the TIBETAN MASK from the pedestal and go back the way you came. Turn around and this time, go up the ramp to the right. Follow this passageway past a barred window that overlooks the buildings you encountered in the previous level. At the end of the passage, ready weapons, jump down into the room below and kill a yeti. Light a flare and throw it into the dark room below. You should be able to see and kill the second yeti lurking below. When it�s dead, cross the room to pick up a large med-pack then drop down at the middle of the opening nearest the med-pack to avoid the spikes. Take the 2 sets of auto pistol clips from the floor in the far right corner. Climb onto the ledge with the red columns. There�s a small med-pack at one end and a switch, which opens the exit door, at the other end. When you step out onto the bridge, you�ll notice that you�re now above the area you explored in the previous level. At the beginning of the bridge, turn to the left then take a running jump to the ledge opposite to get some flares. Jump back to the bridge then go across; turn left and go through an opening in the snow. Jump across the rocks to the left to find a switch. Pull it to spill hot oil from the firepot onto the ice below, melting it so you can get into the water. Jump down via the angled blocks below and to the right of the switch. Kill the 2 tigers that charge in from the cave with the ice wall. Go into that area to pick up 2 boxes of shotgun shells. Then climb over the rocks near the opening and jump into the water. Now there are 2 sets of Uzi clips down there. Return to the hole you just made in the ice and jump into the water. Grab the GONG HAMMER and climb out to shoot the 2 biting fish. Once you�ve taken care of them, jump back in the water and swim under the ice through an opening into the next cavern. Wade out of the water, avoiding the falling icicles, and kill the 3 yetis waiting here. When the coast is clear, head for the openings opposite the water. Enter the one on the left, taking care to avoid the falling icicles. When you approach the low ice wall, another yeti charges. Kill it, then go behind the wall and collect 4 pairs of grenades. Return to the cave with the pool and go through the door on the right. As you enter, 2 yetis attack one from behind and another from the top of the ice steps. Kill both, and then take the small med-pack lying on the ground. Continue to a large, sloped cave with many snowballs at the top of the hill. Walk a few steps into the room to trigger the first wave of snow, and back flip to the safe spot in the doorway. Do this again for a second bunch of snowballs. For the remaining avalanches, you�ll need to go farther down the slope to set them off, but you can run to the left wall (facing downhill) for safety. Jump over the snowballs into the doorway. To cross the first deep chasm, slide backwards down the slope, traverse left, then pull up and back flip into the doorway behind. To cross the next chasm, do a running jump from the doorway to grab the ice ladder opposite. Climb to the opening at the top. Slide backwards down the next icy slope, grab the edge then drop to the ground in front of a huge gong. Before striking the gong, climb down the ice and cross to the far-left corner. Do a standing jump to grab the ladder. Climb to the bottom, then drop down on the left. Flip the switch to open the door to the building above. Climb back up, back flipping from the ladder across the gap. Go to the building and take SECRET #3, the Jade Dragon (with a bonus of 4 pairs of grenades for finding all 3 secrets). Climb up to the gong and use the hammer to strike it. This will break the ice windows on either side of the structure below so you can enter and take the TALION. Climb down to the floor for the final battle of the level. When you hit the ground, a huge, wingless bird monster, the Guardian of the Talion, emerges from the ice doorway on the right. Inside the monster�s cave on the right side of the flat area with the pillars are 2 sets of Uzi clips and a large med-pack. Hit the ground on the side farthest from the Guardian�s cave entrance, then run/jump into the cave, while the monster goes the long way around the pillar to get to Lara. Pick up one item, then roll and jump past the monster that should be just reaching the cave entrance. Run around the pillars (counter-clockwise) and back into the cave. The guardian will pursue and you�ll have a chance to grab the second item. Jump out past the beast again and get ready to kill the Guardian. Immediately jump up to the left side of the ice building and shoot the monster from safety. Once it is dead, the level ends.
In the movie following, Lara emerges and steals a Jeep from the bad guys�. A car chase ensues, with Marco Bartoli and his henchmen in hot pursuit of our heroine. Of course she makes a getaway and soon returns to the doors of the Xian temple. She uses the Talion to open the puzzle-lock door, and the next level begins.
Kills: 36 Items: 31, plus Dragon Seal, Gold Key, Silver Key, Main Chamber Key Secrets: 3
Go through the antechamber toward the pedestal at the centre of the large room. There it is the Dagger! But of course it�s not that easy. As you approach, the floor drops away, land below, slide and grab the edge. Drop and slide, jump over the blade and continue sliding. The boulder will pass overhead. When you get to the wet, grey slide, jump and roll (Alt + End) so you�re facing up the slide and can grab the edge at the end. Traverse left and pull up into an alcove where you�ll find SECRET #1, the Gold Dragon. Dive into the water, go over the falls and climb out on the platform on the other side of the lower pool. Shoot the 2 fish. Note the nearby keyhole, the gate on the left and the ladder on the right. There are two underwater openings across the pool. Find the one on the right. Within this opening, branching off to the right, is a narrow, underwater tunnel, down which you�ll find a small med pack. Return to the wider passageway then swim up into the temple area. Exit the water on the rocks at the left side and pick up some shotgun shells. Ready that gun; and approach the temple doors, 2 tiger�s emerge-one from the left behind the stairs, the other from the right side at the top of the stairs. After killing them, go around the left side of the building. Run onto the springboard and bounce up to land on the roof. Cross the roof and throw the switch, which opens the trapdoor you saw earlier. Kill the bird that flies in from the far side of the cavern. Then drop down and swim back through the underwater opening and return to the ladder that leads up to the trapdoor. Climb up, kill a spider, and continue to a ledge above a room with a large wooden pillar in the centre and lava below. Turn around, drop off the ledge and grab the edge. Climb down the ladder all the way to the bottom, then drop and grab the ledge below. Traverse to the left, hanging onto the crevice, until you can pull up. Walk to the left, descend the next ladder to the bottom and again drop and grab the ledge below. Pull up then walk to the right, drop and hang, traverse to the right and pull up into an opening where you�ll find SECRET #2, the Stone Dragon. Return to the previous landing the way you came. Head to the left and kill a spider. Jump and grab the ladder on the pillar. Climb up and follow the passage to a room with ladders and spikes below. Climb the ladder to the crevice, traverse to the right, back flip to the ledge behind, then jump forward to the flat spot above where you just were. In the next area, run across the broken tiles and stop on the last one. You�ll fall to the pedestal below, where you can pick up some shotgun shells. Do a running jump over the lava to the opening, slide down and jump over the spikes to land on the angled block ahead. Immediately jump again over a second set of spikes to grab a ledge. Pull up, and then slide down the angled block to safely pick up the grenades on the ground. Climb up until you reach a switch. Pull it to open the main doors to the temple. Jump down into the water and head back to the temple. Enter through the doors you just opened and go to the rear, avoiding the robot guards. You�ll see some M-16 clips lying on the floor. Approach them from the back to avoid being sliced by the robot guard�s sword. Go through the right doorway in the rear wall and climb up until you reach a room with many angled rocks and lava below.You�ll need to make a complicated series of jumps to get through here. Landing on each angled surface should cause Lara to turn and face downhill. When she does, jumping will propel her forward to the next slope.
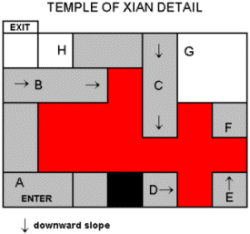
Here�s the sequence: From the doorway (A), take a running jump straight across to the long block that slopes down to the right (B). As you start to slide, jump forward to the next angled block ahead (C). Slide then press and HOLD the Jump key. Lara will jump forward to land on a small angled block (D), then immediately jump to a fourth sloped block (E), and from there to the final block (F) on the far side of the lava pit. Release Jump and climb up to the top of the rocks (G). From here take a running jump to grab the ledge above and opposite the entrance (H). Then climb to the next area. Approach the fake switch, the floor collapses and you slide into the room below. When you land, you should be positioned in the middle of the walkway with the med-pack and the skeletons. Jump forward and press action, Lara should pick up the med-pack. Jump forward again, run to the switch and throw it. Now jump backward with a mid-air twist (Alt + down arrow + end). Now Lara should be facing the exit. Take a running jump, then keep running through the door and the spikes don�t get you. Continue to the next room. Head up the ramp, then quickly back and side flip to get out of the way of the rolling metal ball. At the top another ramp slopes down to the right. A second ball comes from the top left. You can trip it by running up the ramp and into the depression at the left side. Climb up the step and run over the ramp to trigger yet another metal boulder. If you just keep running, you�ll land safely below on the first ramp. Climb back to the top and follow the ladders up. Drop into the dark room. Cross to the far right and trip the switch, which opens a gate above and to the left, and also frees a tiger, which charges from behind you. Once you�ve killed it, go through the opening to a ladder rigged with slicing blades. Jump and grab the ladder. Climb down until Lara�s feet are just above the blade. As the blade begins to open, release Action to drop past it. Quickly press Action again to grab the ladder below. Repeat the process with the second blade, and then drop into the room below. Here you�ll find two perpendicular rolling blades. Time a run past them one at a time. Once you�ve passed both, you�ll emerge in the anteroom above the robot guards. Kill the 2 birds. On the wall at the right side is a button that opens the door on the far wall. It�s on a timer so press the button, press Look to get Lara�s perspective back, roll, then do a series of running jumps across the beams: the first two can be taken at a smooth run, the third needs an extra step beforehand. (That is, hold Forward and Jump for the first two running jumps, then release the Jump key to let Lara take another step before pressing Jump again. She�ll then take 3 steps, instead of the usual 2, before taking off.) Keep running through the door before it closes. Beyond this doorway is a room with a narrow walkway over lava. Four spiked balls swing from the ceiling. Stand to one side of the walkway and run past each ball in turn. Next comes a doorway with a button on each side and a lava-filled hallway with breakaway floor tiles beyond. The button on the right raises a grate between the solid floor and the tiles; the one on the left opens the gate beyond. Press the right button, side flip, press the left button, and run through the doorway. Cross the broken tiles, stop on the first solid block and safety drop backwards, grabbing the edge of the floor. This way a boulder sails past and you can pull up and continue at a leisurely pace. Once you get across the end of the bridge to the platform on the other side, take the DRAGON SEAL. Then take a running jump to the flat ledge on the right of the dragon. Climb up to the room at the rear. Kill 2 spiders and get 2 sets of auto pistol clips. Pull the switch to raise blocks in the lava out in the main room. Go down toward the lava on the right side (the opposite from where you came up). Run and jump to the low, brown block near the wall, and again to the next block. Run and jump to the short angled block near the stone pillar holding up the bridge, jump to grab the edge of the taller angled block. Pull up, and then slide down the front, jumping to land on the flat, high block. Take a running jump and grab the higher block on the right, then another running jump to the lower block below. You should now be facing the sloped wall where you first entered this area. The ornate block in the lava below, which was a burner when you entered, is actually a springboard. Stand at the edge of the block facing the springboard. Hop back, and then do a standing jump to the board. Hold down Action + Forward to jump from the springboard onto the ledge above. Immediately safety drop backwards, grabbing the ledge to avoid a rolling boulder from above. Run and jump to the flat area ahead and to the right. Jump to the bricks on the right to avoid another boulder. Now hopscotch across the flat brick areas to the top right. You�ll need to kill a bird on the way. When you�ve made it to the highest brick block on the right side, slide down the ramp facing the springboard at the bottom. As you slide, press forward and Lara will spring up to land on her feet on the platform high above. Take a running jump to grab the edge of the platform on the opposite side of the room. Pull up and take possession of SECRET #3, the Jade Dragon (with a bonus of 8 sets of Uzi clips for finding all secrets). Run and jump down to the first brick platform on the left side of sloped wall below. Climb to the room at the top left, taking care to avoid the spikes hidden in the sloped floor. Pull out the block and go through the opening into a small room. Use the switch to open the trapdoor. There�s a ramp below with a boulder set to roll. Run down ahead of the boulder and head to the left. Slide down the next ramp to emerge again in the rafters above the robot guards. Now there are 2 tigers lurking below. Kill them before climbing down. Use the Dragon Seal to open the gate at the back of the room. Enter and follow the passage to a rolling blade. Run down the hallway, ducking into the alcoves to avoid the blade. The last alcove is actually a doorway with a slide leading down to a room knee-deep in water. The spiked ceiling descends and you need to flip all three switches to open the exit door. (There are also a number of decoy switches but if you look carefully, these aren�t realistic enough to really trip you up.) There is also a small med-pack on the floor near the skeleton. You may have time to pick it up if you move quickly. Exit to a room with a waterfall. Jump from the lower block to grab the higher one. Climb up and take a dip in the pool to draw out a fish. Kill it before proceeding. This next section has a complex series of underwater levers and gates. Here�s the drill: On one side of the pool is an underwater opening with a strong current that prevents you from swimming through. Opposite is a closed gate and lever, which raises the water level and turns off the current. After pulling this lever, head to the right and up to get air and pick up a large med-pack and some grenades. Take a deep breath and swim down and to the left, through the tunnel, which slopes up then down. Bypass the lever on the left. (It lowers the water level, sweeping Lara back to the big pool.) Instead, take the passage to the right. Swim forward, pick up the small med-pack, and then go back for air. Return to where you got the med-pack and pull the lever on the left to open the door opposite. Roll, swim forward and pull another lever at the end of this short passage. This opens a gate out in the big pool. Swim out for air, and then go back under through the gate you just opened. (It�s in the big pool next to the first lever you pulled). There�s a lever on the right side of this passage. Pull it to open the gate above the centre of the big pool. Swim up to it and climb out. Kill a fish in the water before retrieving 2 boxes of shotgun shells under the water and some M-16 clips on the pedestal. In the next room, a spiked wall comes from the right, and the switch on the far-left wall opens a trapdoor nearby. Get down through it as quickly as possible. You�ll slide into the water and the current will carry you to the GOLD KEY. The gate opens as you approach, and you can swim through to end up back near the temple entrance. Return to the platform below the falls where you began the level and use the gold key in that keyhole. This opens the gate to the left. Go through, and then swim underwater to the right, right again and into an underwater room with closely spaced pillars. There�s a small med-pack on the floor and pesky fish following Lara around. The door closes behind you. A lever on the back of the first pillar opens the other door next to the first. Pull the lever, exit, and swim out and up for air, then return to the platform with the keyhole to kill the fish. Pulling that last lever also opened a trapdoor farther down the underwater passage. If you�re in the pillar room, swim straight ahead to reach it. If you�re on the platform, swim through the gates, forward, then to the left. Swim up through the trapdoor you just opened, upward some more, and climb out of the water on a wooden platform to kill another fish. Enter the room with all the spider webs with guns drawn. There�ll be 2 small spiders to start. Turn left and approach the flares on the ground. Two more spiders drop from the ceiling. Kill them and take the flares. You can go through the webs on the left to get some Uzi clips. A giant spider and a small spider attack, so take care of those, then cross to the other side of the room. There�s another alcove and 2 more small spiders within. Kill those and continue on to the doorway of a large room with a glowing egg sac suspended in the middle. Near the doorway another giant spider emerges, and as you enter 2 more giant spiders drop from the web. Once the coast is clear, cross to the far side of the room and climb on the one stone block you can reach. Run, jump and grab the higher block to the left. Turn around and jump to grab the ledge above. Proceed from ledge to ledge clockwise around the perimeter of the chamber. Kill the giant spider that drops to the L-shaped ledge when you reach it. From the L-shaped ledge, take a running jump to the pillar at the centre, then another running jump to grab the pillar below the doorway. From here you can do a standing jump to grab the doorsill. Go through this room to the opening over the water. Run, jump over the water and grab the rocks. Climb up and take the SILVER KEY. Return via the water to the cave with the temple. Use the silver key to open the door on the right. Enter and climb on the lowest block. Jump and grab the next higher block, pull up, jumping to the side to avoid a rolling boulder, and back again to avoid another. Continue to the top and pick up some auto pistol clips on the floor where the boulders originated. Cross the bridge, killing a tiger and a bird, then a second tiger in the room beyond. Continue to a room with a blade rolling back and forth and an open doorway to the left just before it. Jump through this doorway diagonally, so as to land on the slope. Slide back and grab the edge. Climb down, let go and catch the ledge below. Pick up the Uzi clips then continue down the hallway. Drop down into the water outside the temple. Retrace your steps into the temple and up to the rolling blade. Stand on the slightly sloped floor facing the blade but angled a bit to the right. Take two standing jumps, timing them to avoid the blade, and land on the top tier. Enter the room with the motionless blade and pick up 2 sets of Uzi clips and a large med-pack. Cross the bridge. The blade doesn�t start rolling until you do. Push the button to open doors back in the temple. Kill another bird, and then time a run back across the bridge. If you run after the blade as it rolls away, you�ll have just enough time. From the room where you killed the tigers, climb to the grey stones. Here you�ll find a series of tiered springboards. Stand with Lara�s back to the lowest springboard. Walk 3 steps forward, then back flip onto the springboard behind her. This should cause Lara to bounce up the slope using all four springboards. Press Action before landing on the last springboard to make Lara grab the ledge above it after takeoff. Kill the bird that dive bombs you at the top. Then jump to grab the doorsill of the room above. Enter this large, lava-filled room. Go to the end of the walkway you�re on, and jump diagonally to the right to land on small platform near a keyhole. From here, jump to a large, flat area to the right. Run to the ladder on the far side and climb up before the spiked wall arrives. Dismount on the ledge above. Climb up to the next room and run to the right, jumping the gap over the spikes and grabbing the ladder opposite. More spikes close in, so you�ll need to be quick about it. Climb up and follow the passageway past two gates looking out over two huge dragon statues, one on each side. Continue forward then to the right, where you�ll find a switch. Pull this to open one of the two gates you just passed. Return to this gate, enter and take a running jump to grab the platform on the left. Jump to the next platform, then jump and grab the next platform, pull up and pick up the MAIN CHAMBER KEY. Drop down to the dragon�s neck. Slide down its back to land on a flat block below. Hop down to the lowest step and from there take a running jump to the walkway where you came in. Again, go to the end of the walkway, jump across to the keyhole and use your newly acquired key in it. This raises a grate on the stone pillar behind you. Jump back to the walkway by the door, then run, jump and grab the grate. Pull up and jump from the grate to the block below the ladder. Climb up to the platform on the right. Turn around and jump over the spikes to grab another ladder. Climb again until you reach the small hallway with the two gates where you were earlier. Now the second gate is open containing the central pillar extending all the way to the ceiling. Jump from platform to platform clockwise around the room until you�re facing a block that slopes down toward the dragon. Jump to it and immediately jump again to land on the flat area on the dragon�s neck. Climb the ladder until you reach a blade. Position Lara�s hands two rungs below the blade then back flip onto the angled block behind. Jump and grab as you slide to catch hold of the next ladder. Climb to the next blade, position Lara�s hands two rungs below it and press Jump and Roll keys, then Action (Alt + End...Ctrl) to make Lara leap from the ladder, twist in the air, then grab the ladder behind. Continue up until you can get off the ladder on the right. Enter this corridor to finish the level.
Here you get another cut scene: Lara emerges above the chamber where the Dagger of Xian rests, only to find that Marco Bartoli has beaten her to it. She watches from the shadows as Bartoli plunges the dagger into his heart. He collapses and his henchmen carry him out on their shoulders. Naturally, Lara follows.
Kills: 26 Items: 33, plus Mystic Plaques #1, Mystic Plaques #2 Secrets: 3
Move forward to the end of the walkway and take a look around: ahead and below is a Mystic Plaque on one of the small, green "floating islands." Off to the right on the roof of a building, is the Jade Dragon. You�ll get to these soon. As you stand there, a flying warrior approaches very slowly from the right. They are deadly at close range, but you can usually take them out from a distance. This one can be killed as it moves through the air toward you. When it explodes, turn around and head back toward the level�s entrance and to the right. On the ground is a small med-pack. Now, return to the end of the flat walkway so you�re facing a green island shaped like a double ramp or an upside-down "V." Jump to the left side of the ramp, slide forward and jump to the angled green block ahead, then from there jump to grab the stone ledge of the gold latticework building. If you miss grabbing this ledge, you�ll slide down to the stone ledge below. A petrified guard will come to life on the next island over. Kill it in the air and cross over to the island. Use the rocks on the right of the guard�s alcove to climb back to the top to try that jump again. Once inside the latticework building, throw the switch, which opens a trapdoor on the underside of the building where you saw the Jade Dragon, as well as a gate at the end of this building. Return to the ledge where you entered this building and drop down to the slope below. Climb up the rocks to the right of the guard�s alcove to the top near the double ramp where you started. This time jump to the left side, facing backwards, to slide down the ramp and grab the edge. Drop to the ledge below, then jump across to the small island and take the 1st MYSTIC PLAQUE. Jump across the green rocks to the island with the building on it. This will awaken one of the 3 stone guards. Kill him. When he�s dead, pull up through the trapdoor into the room above. Here you�ll find 2 sets of Uzi clips, flares, a large med-pack and a 2nd MYSTIC PLAQUE. Kill the guard below through the opening or drop down and finish him off. Climb up on the rocks to the left of the guard platform, near the small tree. From here you can jump and grab the edge of the roof. Pull up and cross to the other side to pick up SECRET #1, the Jade Dragon. Drop back down to the ground. Now go to the right side of the big island drop and hang from the edge, then let go and grab the green ledge below. Pull up, go to the left and pull the switch to lower the gate in the opening opposite so you can walk on it. From there, take a running jump to the green island. Jump to the flat area at the top and from there to the next island on the left. Follow its "L" shape to the end, and then take a running jump to grab the small, square island beyond. From here, leap across to grab the lowest step of the 4-tiered island beyond. To get all the kills, climb to the top of this island then walk across to the roof of the gold lattice building. One of the 2 petrified guards on the island opposite will awaken when you reach the top green step. The other will awaken when you step on the gold roof. Activate them one at a time and shoot as they approach. Once the guards are dead, go back down to the bottom of the green steps and jump across to the island where they were. Take the 2 sets of Uzi clips and use the plaques in the receptacles to open the door. Shortly after you enter, a flying guard rises up from below the bridge on the left. You�ll have time to kill him in the air if you�re waiting for him. After he�s dead, pick up 2 sets of auto pistol clips on the ground to the right. Climb up the rocks behind the small tree nearby. Here you�ll see an opening at the top of a slope. Turn around, back up to the base of the slope and back flip to land inside the opening. Follow the passage to SECRET #2, the Stone Dragon. To get back, turn around and take a diagonal standing jump into the tunnel opening. Then follow the tunnel back to the tree. Cross to the opposite side of the courtyard and climb/jump up to the green boulder. Position Lara�s back to the boulder and back flip over it. Slide down the slope ahead of the rolling boulder, then hop back and grab the ledge as the boulder sails overhead. Only then pull up. Turn and jump across the gap. Then go to the flat area near the top of the ramp. Take a running jump to the island with the rope slide handle. When you land, slide back and grab the edge, traverse right and pull up. Now ride the rope slide, dropping off on the lower bridge. Enter the room and kill the first of 3 stone guards, who awakens as you arrive. Pull the switch between the other two, which awakens them. When the guards are dead, go through the other door to the left of the entrance. There you�ll find a second rope slide. Ride it down, keeping the Action key pressed, to grab the lattice on the opposite side. Climb to the top of the lattice, then up a second lattice and over to the right side, where you can dismount. At the green doorway, hang and drop, traverse left then drop to the ground. Drop down through the opening to the floor below. Kill the guard who awakens above near the top of the rope slide. Take the small med-pack lying on the ground, then return up through the opening. Climb the green block and pull up onto the roof, then jump over the slanted roof to land on the green slide where the boulder trap was. Return to the top of the first rope slide. This time, ride it all the way to the end. When you land, turn around. Jump to the flat area on the right side of the gap with lava below. A flying guard sails in from the left. Cross the gap to the other side and a second guard follows. After you�ve killed the guards, jump back across the gap and pull up on the angled wall to the right of the opening where the cable comes in and back flip onto the platform. Pull the switch on the column to drop a block into the gap below to make a bridge. Climb down and safety drop into the gap onto the block. Flip the switch to open a trapdoor in the lava above. Climb up out of the pit by jumping from the block/bridge, over the lava, to grab the block to the left. Pull up and climb out of the pit, taking care to avoid the shooting blades. Climb back up to the switch platform and from there onto the wall, where you�ll find 2 sets of M-16 clips. From here, take a running jump, pressing Action while in the air, to sail through the opening in the lava and land in the water below. Pick up some shotgun shells from under the water. Cross the room and pull a switch, which raises a gate above the lower end of the rope slide. Return to the deeper water, and then swim down and to the left, through a narrow passage. Surface and then climb into the dark alcove above to pull another switch, which turns off the slashing blades. Climb to the top of the tiered wall, again taking care to avoid the shooting blades. Head to the right, then jump back to the flat area on the right. Move the green carved block into the corner near the opening you just came from. Jump from the top of the block into the opening above the rope slide handle. Follow the passage, past a black gate, to a room with a spiked floor. Take a running jump and grab the crevice in the opposite wall. Traverse to the right, pull up and flip the switch to open the black gate. Take a running jump from this alcove back to the upper opening in the opposite wall. Walk forward to the gate you just opened. Slide backwards down the slope through the opening in the floor. Grab the end of the slide and drop into the cage below. There are 4 cult members and 4 stone guards in the area beyond the cage. Flip the switch to raise the cage, roll, then run to the wall and pull up. The goons throw knives, but they will not climb up after you. You can use the column for cover and snipe at them until all are dead. Once the human foes are out of the way, take out the stone guards one at a time. Approach each one in turn to awaken it, and finish it off. Awaken them one at a time and climb back on the wall to kill them from safety. When the coast is clear, recover some goodies from the bodies: 3 sets of Uzi clips, 3 boxes of shotgun shells, a small and a large med-pack. Then flip the two switches in the alcoves where the guards were. One opens the exit gate, the other a door in the room above. Go up the stairs, killing the thug, and taking his large med-pack and auto pistol clips. There are also 2 pairs of grenades on the stairs. At the top of the stairs is the switch that opens the doors and awakens the 2 stone guards beyond. If you�re desperate, you can run past them and jump through the opening in the floor. Slide down the ramp and climb up onto the wall again. The guards will come down the stairs after you. You may have to jump down to the floor once or twice to get their attention, but this is much safer than fighting both of them at once. When they�re dead return to the room at the top of the stairs. Enter the room with the lattice walls and the lava/spike floor. Climb up the lattice. Position Lara�s feet on the rung with no filigree above (6th from the top). Jump off and twist in the air, then grab the lattice behind (Alt + End...Ctrl). Climb to the left, then up to the red-and-green area of the lattice. Position Lara�s feet on the bottom of the red area. Again, jump off, twist and catch the lattice behind. Climb to the top, and get as far to the left as possible. Pull up and back flip then side flip to the left to land on the flat area. Avoid the shooting blade trap and immediately draw weapons to kill the goon. Take his shotgun shells. Move the stone block in the way of the blades and jump to the rocks on the left. Walk to the far end, and then jump across the gap to the lower flat area. Take a running jump back across the gap to the opening below the spot from which you just jumped. Follow this passage to SECRET #3, the Gold Dragon. (This is the last secret of the game and carries a bonus of 8 pairs of grenades if you�ve found all three secrets in this level.) Return to the opening above the lava. Run and jump straight across the gap to grab the angled block next to the flat area. Pull up and back flip onto the ledge behind. From here climb back to the top and take the rope slide in.
Kills: 11 Items: 23 plus Mystic Plaque and the Dagger of Xian Secrets: 0
Pick up a large med-pack and 2 sets of Uzi clips from the ground. Walk past the guard into the next room. The stone guard on the opposite side of the room awakens as you enter, so take care of him. The switch on the far side of the room awakens the first guard without opening any doors. Pull the switch on the side of the door through which you entered. This wakes up the two guards on the sides and opens the exit door. After you�ve killed the guards, advance into the next room. It�s dark and there are many pillars in here. 6 goons are lurking in the shadows. You can draw them out one or two at a time by advancing slowly into the room, weapons drawn, then backing out as they emerge from hiding. When all 6 are dead, recover their stuff: a large and a small med-pack, 6 sets of Uzi clips and a MYSTIC PLAQUE. Use the Plaque to open the door and enter the Dragon�s Lair. Bartoli�s body lies on a low platform at the centre of this huge room. When you step within the area marked off by the pillars, he magically transforms into a huge dragon. You need to bring it down, then pull the dagger from its belly. If you don�t get the dagger in time, the dragon revives and the whole ordeal starts again. There are a number of holes in the floor leading to a water-filled room below. Down here are 10 pairs of Uzi clips and 2 large med-packs in case you need backup. There are many ways of killing the dragon. My favourite is to approach the centre of the room from the left, keeping behind the pillar. When the dragon rouses, edge toward the right until you�re able to target it from behind the pillar. It won�t come around the pillar if you�re positioned correctly. If you do get lit up, either restart or drop into one of the pools. It�s difficult to climb back out of the water without getting toasted. To do this, surface then immediately swim under to the opposite side of the room to climb out. The dragon may not be able to get there as fast as Lara can. Once the dragon is down, run to its belly and use the Action key to pull out the DAGGER OF XIAN. If you�re having trouble doing this, try sidestepping so Lara�s right arm is directly in front of the red spot where the dagger is. Or, jump straight up to land a little closer to the dragon and try again. When you�ve got the dagger, the exit door opens and the place starts to collapse. If you like, you can now go into the water underneath and pick up all the goodies. They won�t be of any use to you, since you begin the next level without them, but if you�re after a perfect item score, it�s possible. Now, run through the exit door and down the passageway to end the level. There�s a movie sequence in which Lara runs from the exploding Wall and is knocked to the ground. She awakens some time later and realising that she has put numerous animals on the endangered species list, and destroyed china�s greatest monument she heads for home.
Kills: 16 Items: 34 plus the Shotgun Secrets: 0
This short level begins with Lara at home again admiring her new prize. The alarms go off as two vans full of Fiama Nera goon�s bust into the estate. Hurry to the other side of the bed and unlock the gun closet. Inside is the shotgun. There are more shells on the same shelf in the closet-27 boxes of shells in all-along with 2 bunches of flares and 1 small and 2 large med-packs. You may not have time to pick them all up at first, so go for the gun and initial shells. Two thugs and a dog will enter the bedroom first from the door on the left. To keep the fight simple, stay in the closet and wait, shooting them as they approach. Then gather any stuff you weren�t able to get at first. When you go out into the bedroom, another goon enters via the balcony on the right. He has a box of shells. Head down the stairs. Depending on how long you took in the bedroom, 2 more bad guys may have come up the stairs. If not you�ll meet them at the door. Two more dogs and 4 more men are waiting outside. You can draw them out by stepping through the door then retreating into the house. One of these guys has a small med-pack. Two more men and a dog come out of hiding when you approach the low hedges to the left of the door. Follow the path toward the assault course. About halfway down roll and start backing in. The final enemy, a thug with 2 big guns, will follow. He�s hard to kill but when he falls, that�s the end of the game. Off to the showers to clean up and unwind.
Congratulations! You just completed Tomb Raider II.